Welcome to Envoy Gateway
Envoy Gateway Documents
Note
This project is under
active development. Many features are not complete. We would love for you to
Get Involved!
Envoy Gateway is an open source project for managing Envoy Proxy as a standalone or Kubernetes-based application
gateway. Gateway API resources are used to dynamically provision and configure the managed Envoy Proxies.
Ready to get started?
1 - Design
This section includes Designs of Envoy Gateway.
1.1 - Goals
The high-level goal of the Envoy Gateway project is to attract more users to Envoy by lowering barriers to adoption
through expressive, extensible, role-oriented APIs that support a multitude of ingress and L7/L4 traffic routing
use cases; and provide a common foundation for vendors to build value-added products without having to re-engineer
fundamental interactions.
Objectives
Expressive API
The Envoy Gateway project will expose a simple and expressive API, with defaults set for many capabilities.
The API will be the Kubernetes-native Gateway API, plus Envoy-specific extensions and extension points. This
expressive and familiar API will make Envoy accessible to more users, especially application developers, and make Envoy
a stronger option for “getting started” as compared to other proxies. Application developers will use the API out of
the box without needing to understand in-depth concepts of Envoy Proxy or use OSS wrappers. The API will use familiar
nouns that users understand.
The core full-featured Envoy xDS APIs will remain available for those who need more capability and for those who
add functionality on top of Envoy Gateway, such as commercial API gateway products.
This expressive API will not be implemented by Envoy Proxy, but rather an officially supported translation layer
on top.
Batteries included
Envoy Gateway will simplify how Envoy is deployed and managed, allowing application developers to focus on
delivering core business value.
The project plans to include additional infrastructure components required by users to fulfill their Ingress and API
gateway needs: It will handle Envoy infrastructure provisioning (e.g. Kubernetes Service, Deployment, et cetera), and
possibly infrastructure provisioning of related sidecar services. It will include sensible defaults with the ability to
override. It will include channels for improving ops by exposing status through API conditions and Kubernetes status
sub-resources.
Making an application accessible needs to be a trivial task for any developer. Similarly, infrastructure administrators
will enjoy a simplified management model that doesn’t require extensive knowledge of the solution’s architecture to
operate.
All environments
Envoy Gateway will support running natively in Kubernetes environments as well as non-Kubernetes deployments.
Initially, Kubernetes will receive the most focus, with the aim of having Envoy Gateway become the de facto
standard for Kubernetes ingress supporting the Gateway API.
Additional goals include multi-cluster support and various runtime environments.
Extensibility
Vendors will have the ability to provide value-added products built on the Envoy Gateway foundation.
It will remain easy for end-users to leverage common Envoy Proxy extension points such as providing an implementation
for authentication methods and rate-limiting. For advanced use cases, users will have the ability to use the full power
of xDS.
Since a general-purpose API cannot address all use cases, Envoy Gateway will provide additional extension points
for flexibility. As such, Envoy Gateway will form the base of vendor-provided managed control plane solutions,
allowing vendors to shift to a higher management plane layer.
Non-objectives
Cannibalize vendor models
Vendors need to have the ability to drive commercial value, so the goal is not to cannibalize any existing vendor
monetization model, though some vendors may be affected by it.
Disrupt current Envoy usage patterns
Envoy Gateway is purely an additive convenience layer and is not meant to disrupt any usage pattern of any user
with Envoy Proxy, xDS, or go-control-plane.
Personas
In order of priority
1. Application developer
The application developer spends the majority of their time developing business logic code. They require the ability to
manage access to their application.
2. Infrastructure administrators
The infrastructure administrators are responsible for the installation, maintenance, and operation of
API gateways appliances in infrastructure, such as CRDs, roles, service accounts, certificates, etc.
Infrastructure administrators support the needs of application developers by managing instances of Envoy Gateway.
1.2 - System Design
Goals
- Define the system components needed to satisfy the requirements of Envoy Gateway.
Non-Goals
- Create a detailed design and interface specification for each system component.
Terminology
- Control Plane- A collection of inter-related software components for providing application gateway and routing
functionality. The control plane is implemented by Envoy Gateway and provides services for managing the data plane.
These services are detailed in the components section.
- Data Plane- Provides intelligent application-level traffic routing and is implemented as one or more Envoy proxies.
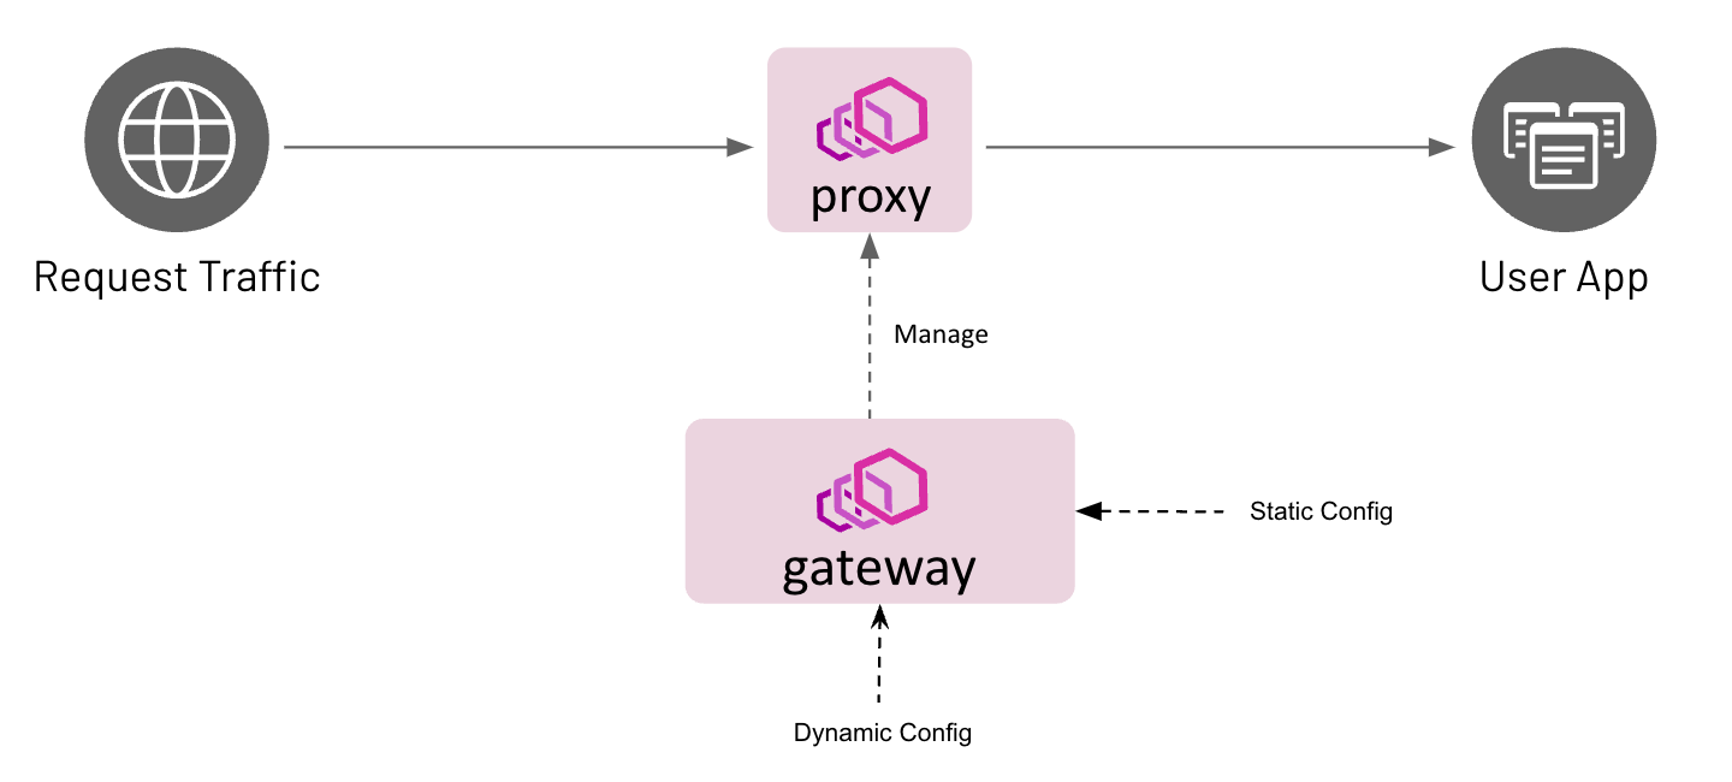
Architecture
Configuration
Envoy Gateway is configured statically at startup and the managed data plane is configured dynamically through
Kubernetes resources, primarily Gateway API objects.
Static Configuration
Static configuration is used to configure Envoy Gateway at startup, i.e. change the GatewayClass controllerName,
configure a Provider, etc. Currently, Envoy Gateway only supports configuration through a configuration file. If the
configuration file is not provided, Envoy Gateway starts-up with default configuration parameters.
Dynamic Configuration
Dynamic configuration is based on the concept of a declaring the desired state of the data plane and using
reconciliation loops to drive the actual state toward the desired state. The desired state of the data plane is
defined as Kubernetes resources that provide the following services:
- Infrastructure Management- Manage the data plane infrastructure, i.e. deploy, upgrade, etc. This configuration is
expressed through GatewayClass and Gateway resources. The
EnvoyProxy Custom Resource can be
referenced by gatewayclass.spec.parametersRef to modify data plane infrastructure default parameters,
e.g. expose Envoy network endpoints using a NodePort service instead of a LoadBalancer service. - Traffic Routing- Define how to handle application-level requests to backend services. For example, route all HTTP
requests for “www.example.com” to a backend service running a web server. This configuration is expressed through
HTTPRoute and TLSRoute resources that match, filter, and route traffic to a backend.
Although a backend can be any valid Kubernetes Group/Kind resource, Envoy Gateway only supports a Service
reference.
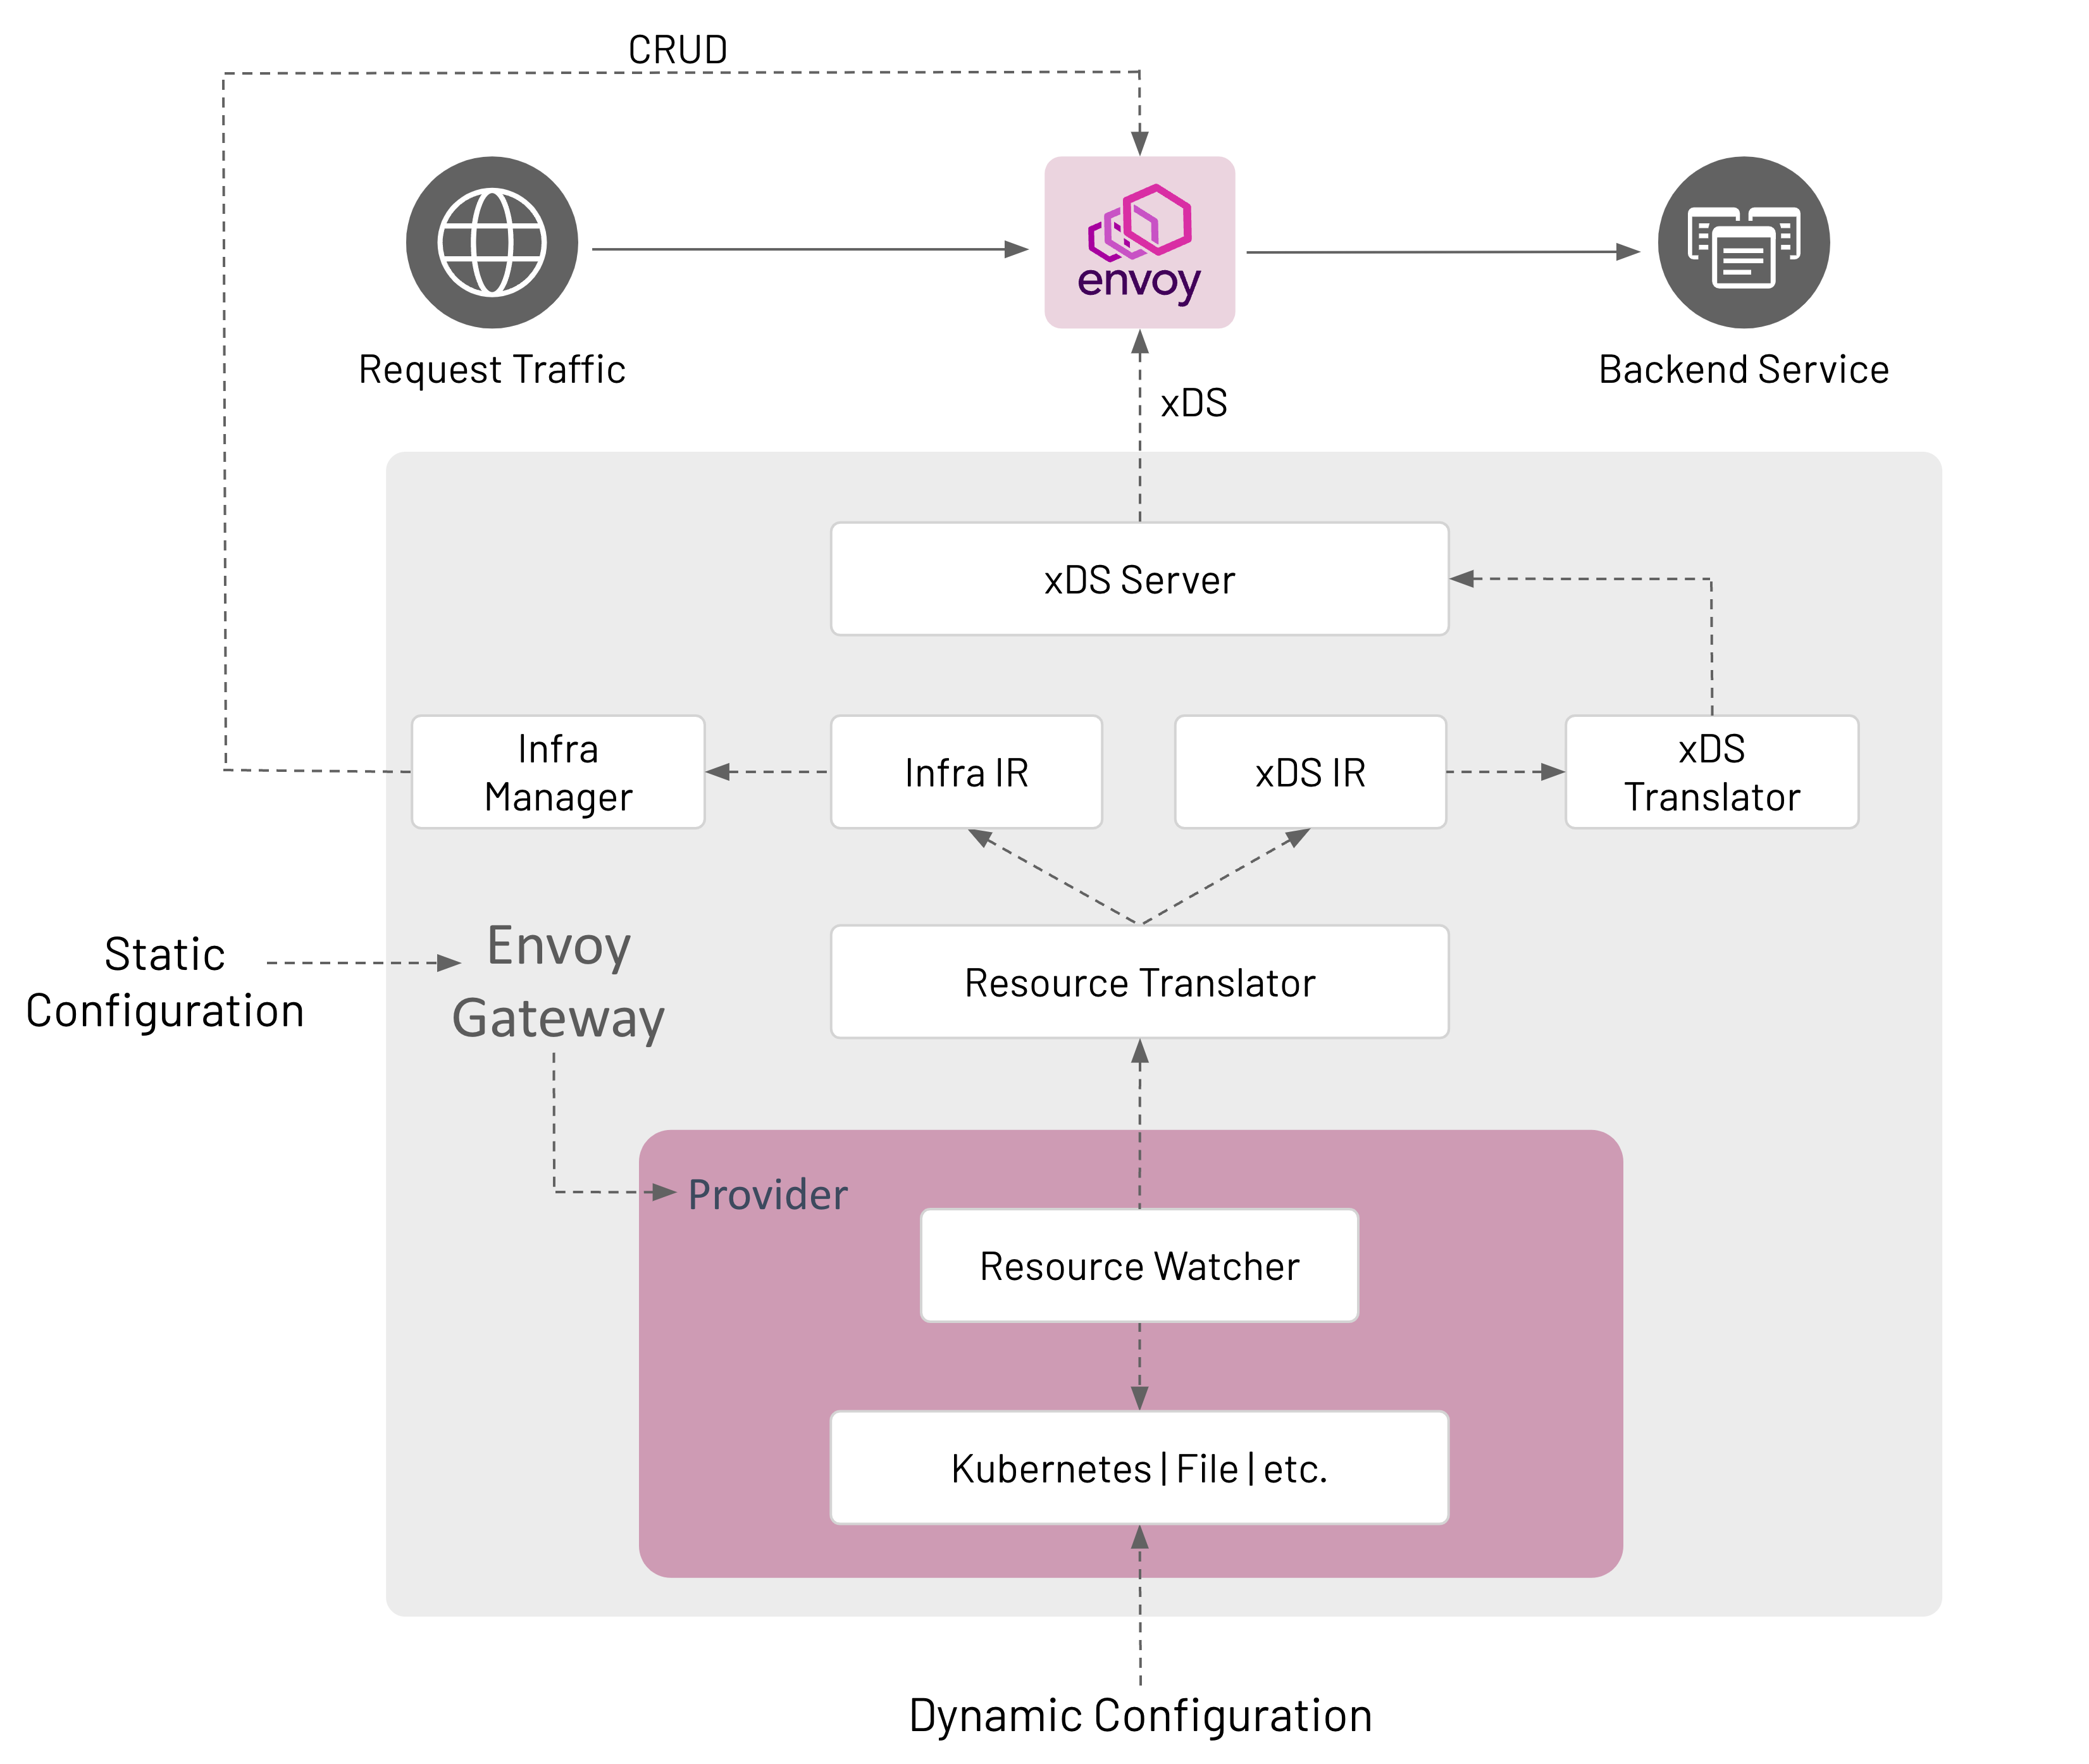
Components
Envoy Gateway is made up of several components that communicate in-process; how this communication happens is described
in the Watching Components Design.
Provider
A Provider is an infrastructure component that Envoy Gateway calls to establish its runtime configuration, resolve
services, persist data, etc. As of v0.2, Kubernetes is the only implemented provider. A file provider is on the roadmap
via Issue #37. Other providers can be added in the future as Envoy Gateway use cases are better understood. A
provider is configured at start up through Envoy Gateway’s static configuration.
Kubernetes Provider
- Uses Kubernetes-style controllers to reconcile Kubernetes resources that comprise the
dynamic configuration.
- Manages the data plane through Kubernetes API CRUD operations.
- Uses Kubernetes for Service discovery.
- Uses etcd (via Kubernetes API) to persist data.
File Provider
- Uses a file watcher to watch files in a directory that define the data plane configuration.
- Manages the data plane by calling internal APIs, e.g.
CreateDataPlane(). - Uses the host’s DNS for Service discovery.
- If needed, the local filesystem is used to persist data.
Resource Watcher
The Resource Watcher watches resources used to establish and maintain Envoy Gateway’s dynamic configuration. The
mechanics for watching resources is provider-specific, e.g. informers, caches, etc. are used for the Kubernetes
provider. The Resource Watcher uses the configured provider for input and provides resources to the Resource Translator
as output.
Resource Translator
The Resource Translator translates external resources, e.g. GatewayClass, from the Resource Watcher to the Intermediate
Representation (IR). It is responsible for:
- Translating infrastructure-specific resources/fields from the Resource Watcher to the Infra IR.
- Translating proxy configuration resources/fields from the Resource Watcher to the xDS IR.
Note: The Resource Translator is implemented as the Translator API type in the gatewayapi package.
The Intermediate Representation defines internal data models that external resources are translated into. This allows
Envoy Gateway to be decoupled from the external resources used for dynamic configuration. The IR consists of an Infra IR
used as input for the Infra Manager and an xDS IR used as input for the xDS Translator.
- Infra IR- Used as the internal definition of the managed data plane infrastructure.
- xDS IR- Used as the internal definition of the managed data plane xDS configuration.
xDS Translator
The xDS Translator translates the xDS IR into xDS Resources that are consumed by the xDS server.
xDS Server
The xDS Server is a xDS gRPC Server based on Go Control Plane. Go Control Plane implements the Delta xDS Server
Protocol and is responsible for using xDS to configure the data plane.
Infra Manager
The Infra Manager is a provider-specific component responsible for managing the following infrastructure:
- Data Plane - Manages all the infrastructure required to run the managed Envoy proxies. For example, CRUD Deployment,
Service, etc. resources to run Envoy in a Kubernetes cluster.
- Auxiliary Control Planes - Optional infrastructure needed to implement application Gateway features that require
external integrations with the managed Envoy proxies. For example, Global Rate Limiting requires provisioning
and configuring the Envoy Rate Limit Service and the Rate Limit filter. Such features are exposed to
users through the Custom Route Filters extension.
The Infra Manager consumes the Infra IR as input to manage the data plane infrastructure.
Design Decisions
- Envoy Gateway consumes one GatewayClass by comparing its configured controller name with
spec.controllerName of a GatewayClass. If multiple GatewayClasses exist with the same spec.controllerName, Envoy
Gateway follows Gateway API guidelines to resolve the conflict.
gatewayclass.spec.parametersRef refers to the EnvoyProxy custom resource for configuring the managed proxy
infrastructure. If unspecified, default configuration parameters are used for the managed proxy infrastructure. - Envoy Gateway manages Gateways that reference its GatewayClass.
- A Gateway resource causes Envoy Gateway to provision managed Envoy proxy infrastructure.
- Envoy Gateway groups Listeners by Port and collapses each group of Listeners into a single Listener if the Listeners
in the group are compatible. Envoy Gateway considers Listeners to be compatible if all the following conditions are
met:
- Either each Listener within the group specifies the “HTTP” Protocol or each Listener within the group specifies
either the “HTTPS” or “TLS” Protocol.
- Each Listener within the group specifies a unique “Hostname”.
- As a special case, one Listener within a group may omit “Hostname”, in which case this Listener matches when no
other Listener matches.
- Envoy Gateway does not merge listeners across multiple Gateways.
- Envoy Gateway follows Gateway API guidelines to resolve any conflicts.
- A Gateway
listener corresponds to an Envoy proxy Listener.
- An HTTPRoute resource corresponds to an Envoy proxy Route.
- The goal is to make Envoy Gateway components extensible in the future. See the roadmap for additional details.
The draft for this document is here.
1.3 - Watching Components Design
Envoy Gateway is made up of several components that communicate in-process. Some of them (namely Providers) watch
external resources, and “publish” what they see for other components to consume; others watch what another publishes and
act on it (such as the resource translator watches what the providers publish, and then publishes its own results that
are watched by another component). Some of these internally published results are consumed by multiple components.
To facilitate this communication use the watchable library. The watchable.Map type is very similar to the
standard library’s sync.Map type, but supports a .Subscribe (and .SubscribeSubset) method that promotes a pub/sub
pattern.
Pub
Many of the things we communicate around are naturally named, either by a bare “name” string or by a “name”/“namespace”
tuple. And because watchable.Map is typed, it makes sense to have one map for each type of thing (very similar to if
we were using native Go maps). For example, a struct that might be written to by the Kubernetes provider, and read by
the IR translator:
type ResourceTable struct {
    // gateway classes are cluster-scoped; no namespace
    GatewayClasses watchable.Map[string, *gwapiv1b1.GatewayClass]

    // gateways are namespace-scoped, so use a k8s.io/apimachinery/pkg/types.NamespacedName as the map key.
    Gateways watchable.Map[types.NamespacedName, *gwapiv1b1.Gateway]

    HTTPRoutes watchable.Map[types.NamespacedName, *gwapiv1b1.HTTPRoute]
}
The Kubernetes provider updates the table by calling table.Thing.Store(name, val) and table.Thing.Delete(name);
updating a map key with a value that is deep-equal (usually reflect.DeepEqual, but you can implement your own .Equal
method) the current value is a no-op; it won’t trigger an event for subscribers. This is handy so that the publisher
doesn’t have as much state to keep track of; it doesn’t need to know “did I already publish this thing”, it can just
.Store its data and watchable will do the right thing.
Sub
Meanwhile, the translator and other interested components subscribe to it with table.Thing.Subscribe (or
table.Thing.SubscribeSubset if they only care about a few “Thing"s). So the translator goroutine might look like:
func(ctx context.Context) error {
    for snapshot := range k8sTable.HTTPRoutes.Subscribe(ctx) {
        fullState := irInput{
           GatewayClasses: k8sTable.GatewayClasses.LoadAll(),
           Gateways:       k8sTable.Gateways.LoadAll(),
           HTTPRoutes:     snapshot.State,
        }
        translate(irInput)
    }
}
Or, to watch multiple maps in the same loop:
func worker(ctx context.Context) error {
    classCh := k8sTable.GatewayClasses.Subscribe(ctx)
    gwCh := k8sTable.Gateways.Subscribe(ctx)
    routeCh := k8sTable.HTTPRoutes.Subscribe(ctx)
    for ctx.Err() == nil {
        var arg irInput
        select {
        case snapshot := <-classCh:
            arg.GatewayClasses = snapshot.State
        case snapshot := <-gwCh:
            arg.Gateways = snapshot.State
        case snapshot := <-routeCh:
            arg.Routes = snapshot.State
        }
        if arg.GateWayClasses == nil {
            arg.GatewayClasses = k8sTable.GateWayClasses.LoadAll()
        }
        if arg.GateWays == nil {
            arg.Gateways = k8sTable.GateWays.LoadAll()
        }
        if arg.HTTPRoutes == nil {
            arg.HTTPRoutes = k8sTable.HTTPRoutes.LoadAll()
        }
        translate(irInput)
    }
}
From the updates it gets from .Subscribe, it can get a full view of the map being subscribed to via snapshot.State;
but it must read the other maps explicitly. Like sync.Map, watchable.Maps are thread-safe; while .Subscribe is a
handy way to know when to run, .Load and friends can be used without subscribing.
There can be any number of subscribers. For that matter, there can be any number of publishers .Storeing things, but
it’s probably wise to just have one publisher for each map.
The channel returned from .Subscribe is immediately readable with a snapshot of the map as it existed when
.Subscribe was called; and becomes readable again whenever .Store or .Delete mutates the map. If multiple
mutations happen between reads (or if mutations happen between .Subscribe and the first read), they are coalesced in
to one snapshot to be read; the snapshot.State is the most-recent full state, and snapshot.Updates is a listing of
each of the mutations that cause this snapshot to be different than the last-read one. This way subscribers don’t need
to worry about a backlog accumulating if they can’t keep up with the rate of changes from the publisher.
If the map contains anything before .Subscribe is called, that very first read won’t include snapshot.Updates
entries for those pre-existing items; if you are working with snapshot.Update instead of snapshot.State, then you
must add special handling for your first read. We have a utility function ./internal/message.HandleSubscription to
help with this.
Other Notes
The common pattern will likely be that the entrypoint that launches the goroutines for each component instantiates the
map, and passes them to the appropriate publishers and subscribers; same as if they were communicating via a dumb
chan.
A limitation of watchable.Map is that in order to ensure safety between goroutines, it does require that value types
be deep-copiable; either by having a DeepCopy method, being a proto.Message, or by containing no reference types and
so can be deep-copied by naive assignment. Fortunately, we’re using controller-gen anyway, and controller-gen can
generate DeepCopy methods for us: just stick a // +k8s:deepcopy-gen=true on the types that you want it to generate
methods for.
1.4 - Gateway API Translator Design
The Gateway API translates external resources, e.g. GatewayClass, from the configured Provider to the Intermediate
Representation (IR).
Assumptions
Initially target core conformance features only, to be followed by extended conformance features.
The main inputs to the Gateway API translator are:
- GatewayClass, Gateway, HTTPRoute, TLSRoute, Service, ReferenceGrant, Namespace, and Secret resources.
Note: ReferenceGrant is not fully implemented as of v0.2.
The outputs of the Gateway API translator are:
- Xds and Infra Internal Representations (IRs).
- Status updates for GatewayClass, Gateways, HTTPRoutes
Listener Compatibility
Envoy Gateway follows Gateway API listener compatibility spec:
Each listener in a Gateway must have a unique combination of Hostname, Port, and Protocol. An implementation MAY group
Listeners by Port and then collapse each group of Listeners into a single Listener if the implementation determines
that the Listeners in the group are “compatible”.
Note: Envoy Gateway does not collapse listeners across multiple Gateways.
Listener Compatibility Examples
Example 1: Gateway with compatible Listeners (same port & protocol, different hostnames)
kind: Gateway
apiVersion: gateway.networking.k8s.io/v1beta1
metadata:
  name: gateway-1
  namespace: envoy-gateway
spec:
  gatewayClassName: envoy-gateway
  listeners:
    - name: http
      protocol: HTTP
      port: 80
      allowedRoutes:
        namespaces:
          from: All
      hostname: "*.envoygateway.io"
    - name: http
      protocol: HTTP
      port: 80
      allowedRoutes:
        namespaces:
          from: All
      hostname: whales.envoygateway.io
Example 2: Gateway with compatible Listeners (same port & protocol, one hostname specified, one not)
kind: Gateway
apiVersion: gateway.networking.k8s.io/v1beta1
metadata:
  name: gateway-1
  namespace: envoy-gateway
spec:
  gatewayClassName: envoy-gateway
  listeners:
    - name: http
      protocol: HTTP
      port: 80
      allowedRoutes:
        namespaces:
          from: All
      hostname: "*.envoygateway.io"
    - name: http
      protocol: HTTP
      port: 80
      allowedRoutes:
        namespaces:
          from: All
Example 3: Gateway with incompatible Listeners (same port, protocol and hostname)
kind: Gateway
apiVersion: gateway.networking.k8s.io/v1beta1
metadata:
  name: gateway-1
  namespace: envoy-gateway
spec:
  gatewayClassName: envoy-gateway
  listeners:
    - name: http
      protocol: HTTP
      port: 80
      allowedRoutes:
        namespaces:
          from: All
      hostname: whales.envoygateway.io
    - name: http
      protocol: HTTP
      port: 80
      allowedRoutes:
        namespaces:
          from: All
      hostname: whales.envoygateway.io
Example 4: Gateway with incompatible Listeners (neither specify a hostname)
kind: Gateway
apiVersion: gateway.networking.k8s.io/v1beta1
metadata:
  name: gateway-1
  namespace: envoy-gateway
spec:
  gatewayClassName: envoy-gateway
  listeners:
    - name: http
      protocol: HTTP
      port: 80
      allowedRoutes:
        namespaces:
          from: All
    - name: http
      protocol: HTTP
      port: 80
      allowedRoutes:
        namespaces:
          from: All
Computing Status
Gateway API specifies a rich set of status fields & conditions for each resource. To achieve conformance, Envoy Gateway
must compute the appropriate status fields and conditions for managed resources.
Status is computed and set for:
- The managed GatewayClass (
gatewayclass.status.conditions). - Each managed Gateway, based on its Listeners’ status (
gateway.status.conditions). For the Kubernetes provider, the
Envoy Deployment and Service status are also included to calculate Gateway status. - Listeners for each Gateway (
gateway.status.listeners). - The ParentRef for each Route (
route.status.parents).
The Gateway API translator is responsible for calculating status conditions while translating Gateway API resources to
the IR and publishing status over the message bus. The Status Manager subscribes to these status messages and
updates the resource status using the configured provider. For example, the Status Manager uses a Kubernetes client to
update resource status on the Kubernetes API server.
Outline
The following roughly outlines the translation process. Each step may produce (1) IR; and (2) status updates on Gateway
API resources.
Process Gateway Listeners
- Validate unique hostnames, ports, and protocols.
- Validate and compute supported kinds.
- Validate allowed namespaces (validate selector if specified).
- Validate TLS fields if specified, including resolving referenced Secrets.
Process HTTPRoutes
- foreach route rule:
- compute matches
- [core] path exact, path prefix
- [core] header exact
- [extended] query param exact
- [extended] HTTP method
- compute filters
- [core] request header modifier (set/add/remove)
- [core] request redirect (hostname, statuscode)
- [extended] request mirror
- compute backends
- [core] Kubernetes services
- foreach route parent ref:
- get matching listeners (check Gateway, section name, listener validation status, listener allowed routes, hostname intersection)
- foreach matching listener:
- foreach hostname intersection with route:
- add each computed route rule to host
Context Structs
To help store, access and manipulate information as it’s processed during the translation process, a set of context
structs are used. These structs wrap a given Gateway API type, and add additional fields and methods to support
processing.
GatewayContext wraps a Gateway and provides helper methods for setting conditions, accessing Listeners, etc.
type GatewayContext struct {
	// The managed Gateway
	*v1beta1.Gateway

	// A list of Gateway ListenerContexts.
	listeners []*ListenerContext
}
ListenerContext wraps a Listener and provides helper methods for setting conditions and other status information on
the associated Gateway.
type ListenerContext struct {
    // The Gateway listener.
	*v1beta1.Listener

	// The Gateway this Listener belongs to.
	gateway           *v1beta1.Gateway

	// An index used for managing this listener in the list of Gateway listeners.
	listenerStatusIdx int

	// Only Routes in namespaces selected by the selector may be attached
	// to the Gateway this listener belongs to.
	namespaceSelector labels.Selector

	// The TLS Secret for this Listener, if applicable.
	tlsSecret         *v1.Secret
}
RouteContext represents a generic Route object (HTTPRoute, TLSRoute, etc.) that can reference Gateway objects.
type RouteContext interface {
	client.Object

	// GetRouteType returns the Kind of the Route object, HTTPRoute,
	// TLSRoute, TCPRoute, UDPRoute etc.
	GetRouteType() string

	// GetHostnames returns the hosts targeted by the Route object.
	GetHostnames() []string

	// GetParentReferences returns the ParentReference of the Route object.
	GetParentReferences() []v1beta1.ParentReference

	// GetRouteParentContext returns RouteParentContext by using the Route
	// objects' ParentReference.
	GetRouteParentContext(forParentRef v1beta1.ParentReference) *RouteParentContext
}
1.5 - Configuration API Design
Motivation
Issue 51 specifies the need to design an API for configuring Envoy Gateway. The control plane is configured
statically at startup and the data plane is configured dynamically through Kubernetes resources, primarily
Gateway API objects. Refer to the Envoy Gateway design doc for additional details regarding
Envoy Gateway terminology and configuration.
Goals
- Define an initial API to configure Envoy Gateway at startup.
- Define an initial API for configuring the managed data plane, e.g. Envoy proxies.
Non-Goals
- Implementation of the configuration APIs.
- Define the
status subresource of the configuration APIs. - Define a complete set of APIs for configuring Envoy Gateway. As stated in the Goals, this document
defines the initial configuration APIs.
- Define an API for deploying/provisioning/operating Envoy Gateway. If needed, a future Envoy Gateway operator would be
responsible for designing and implementing this type of API.
- Specify tooling for managing the API, e.g. generate protos, CRDs, controller RBAC, etc.
Control Plane API
The EnvoyGateway API defines the control plane configuration, e.g. Envoy Gateway. Key points of this API are:
- It will define Envoy Gateway’s startup configuration file. If the file does not exist, Envoy Gateway will start up
with default configuration parameters.
- EnvoyGateway inlines the
TypeMeta API. This allows EnvoyGateway to be versioned and managed as a GroupVersionKind
scheme. - EnvoyGateway does not contain a metadata field since it’s currently represented as a static configuration file instead of
a Kubernetes resource.
- Since EnvoyGateway does not surface status, EnvoyGatewaySpec is inlined.
- If data plane static configuration is required in the future, Envoy Gateway will use a separate file for this purpose.
The v1alpha1 version and config.gateway.envoyproxy.io API group get generated:
// gateway/api/config/v1alpha1/doc.go

// Package v1alpha1 contains API Schema definitions for the config.gateway.envoyproxy.io API group.
//
// +groupName=config.gateway.envoyproxy.io
package v1alpha1
The initial EnvoyGateway API:
// gateway/api/config/v1alpha1/envoygateway.go

package valpha1

import (
	metav1 "k8s.io/apimachinery/pkg/apis/meta/v1"
)

// EnvoyGateway is the Schema for the envoygateways API
type EnvoyGateway struct {
	metav1.TypeMeta `json:",inline"`

	// EnvoyGatewaySpec defines the desired state of Envoy Gateway.
	EnvoyGatewaySpec `json:",inline"`
}

// EnvoyGatewaySpec defines the desired state of Envoy Gateway configuration.
type EnvoyGatewaySpec struct {
	// Gateway defines Gateway-API specific configuration. If unset, default
	// configuration parameters will apply.
	//
	// +optional
	Gateway *Gateway `json:"gateway,omitempty"`

	// Provider defines the desired provider configuration. If unspecified,
	// the Kubernetes provider is used with default parameters.
	//
	// +optional
	Provider *Provider `json:"provider,omitempty"`
}

// Gateway defines desired Gateway API configuration of Envoy Gateway.
type Gateway struct {
	// ControllerName defines the name of the Gateway API controller. If unspecified,
	// defaults to "gateway.envoyproxy.io/gatewayclass-controller". See the following
	// for additional details:
	//
	// https://gateway-api.sigs.k8s.io/v1alpha2/references/spec/#gateway.networking.k8s.io/v1alpha2.GatewayClass
	//
	// +optional
	ControllerName string `json:"controllerName,omitempty"`
}

// Provider defines the desired configuration of a provider.
// +union
type Provider struct {
	// Type is the type of provider to use. If unset, the Kubernetes provider is used.
	//
	// +unionDiscriminator
	Type ProviderType `json:"type,omitempty"`
	// Kubernetes defines the configuration of the Kubernetes provider. Kubernetes
	// provides runtime configuration via the Kubernetes API.
	//
	// +optional
	Kubernetes *KubernetesProvider `json:"kubernetes,omitempty"`

	// File defines the configuration of the File provider. File provides runtime
	// configuration defined by one or more files.
	//
	// +optional
	File *FileProvider `json:"file,omitempty"`
}

// ProviderType defines the types of providers supported by Envoy Gateway.
type ProviderType string

const (
	// KubernetesProviderType defines the "Kubernetes" provider.
	KubernetesProviderType ProviderType = "Kubernetes"

	// FileProviderType defines the "File" provider.
	FileProviderType ProviderType = "File"
)

// KubernetesProvider defines configuration for the Kubernetes provider.
type KubernetesProvider struct {
	// TODO: Add config as use cases are better understood.
}

// FileProvider defines configuration for the File provider.
type FileProvider struct {
	// TODO: Add config as use cases are better understood.
}
Note: Provider-specific configuration is defined in the {$PROVIDER_NAME}Provider API.
Gateway
Gateway defines desired configuration of Gateway API controllers that reconcile and translate Gateway API
resources into the Intermediate Representation (IR). Refer to the Envoy Gateway design doc for additional
details.
Provider
Provider defines the desired configuration of an Envoy Gateway provider. A provider is an infrastructure component that
Envoy Gateway calls to establish its runtime configuration. Provider is a union type. Therefore, Envoy Gateway
can be configured with only one provider based on the type discriminator field. Refer to the Envoy Gateway
design doc for additional details.
Control Plane Configuration
The configuration file is defined by the EnvoyGateway API type. At startup, Envoy Gateway searches for the configuration
at “/etc/envoy-gateway/config.yaml”.
Start Envoy Gateway:
Since the configuration file does not exist, Envoy Gateway will start with default configuration parameters.
The Kubernetes provider can be configured explicitly using provider.kubernetes:
$ cat << EOF > /etc/envoy-gateway/config.yaml
apiVersion: config.gateway.envoyproxy.io/v1alpha1
kind: EnvoyGateway
provider:
  type: Kubernetes
  kubernetes: {}
EOF
This configuration will cause Envoy Gateway to use the Kubernetes provider with default configuration parameters.
The Kubernetes provider can be configured using the provider field. For example, the foo field can be set to “bar”:
$ cat << EOF > /etc/envoy-gateway/config.yaml
apiVersion: config.gateway.envoyproxy.io/v1alpha1
kind: EnvoyGateway
provider:
  type: Kubernetes
  kubernetes:
    foo: bar
EOF
Note: The Provider API from the Kubernetes package is currently undefined and foo: bar is provided for
illustration purposes only.
The same API structure is followed for each supported provider. The following example causes Envoy Gateway to use the
File provider:
$ cat << EOF > /etc/envoy-gateway/config.yaml
apiVersion: config.gateway.envoyproxy.io/v1alpha1
kind: EnvoyGateway
provider:
  type: File
  file:
    foo: bar
EOF
Note: The Provider API from the File package is currently undefined and foo: bar is provided for illustration
purposes only.
Gateway API-related configuration is expressed through the gateway field. If unspecified, Envoy Gateway will use
default configuration parameters for gateway. The following example causes the GatewayClass controller to
manage GatewayClasses with controllerName foo instead of the default gateway.envoyproxy.io/gatewayclass-controller:
$ cat << EOF > /etc/envoy-gateway/config.yaml
apiVersion: config.gateway.envoyproxy.io/v1alpha1
kind: EnvoyGateway
gateway:
  controllerName: foo
With any of the above configuration examples, Envoy Gateway can be started without any additional arguments:
Data Plane API
The data plane is configured dynamically through Kubernetes resources, primarily Gateway API objects.
Optionally, the data plane infrastructure can be configured by referencing a custom resource (CR) through
spec.parametersRef of the managed GatewayClass. The EnvoyProxy API defines the data plane infrastructure
configuration and is represented as the CR referenced by the managed GatewayClass. Key points of this API are:
- If unreferenced by
gatewayclass.spec.parametersRef, default parameters will be used to configure the data plane
infrastructure, e.g. expose Envoy network endpoints using a LoadBalancer service. - Envoy Gateway will follow Gateway API recommendations regarding updates to the EnvoyProxy CR:
It is recommended that this resource be used as a template for Gateways. This means that a Gateway is based on the
state of the GatewayClass at the time it was created and changes to the GatewayClass or associated parameters are
not propagated down to existing Gateways.
The initial EnvoyProxy API:
// gateway/api/config/v1alpha1/envoyproxy.go

package v1alpha1

import (
	metav1 "k8s.io/apimachinery/pkg/apis/meta/v1"
)

// EnvoyProxy is the Schema for the envoyproxies API.
type EnvoyProxy struct {
	metav1.TypeMeta   `json:",inline"`
	metav1.ObjectMeta `json:"metadata,omitempty"`

	Spec   EnvoyProxySpec   `json:"spec,omitempty"`
	Status EnvoyProxyStatus `json:"status,omitempty"`
}

// EnvoyProxySpec defines the desired state of Envoy Proxy infrastructure
// configuration.
type EnvoyProxySpec struct {
	// Undefined by this design spec.
}

// EnvoyProxyStatus defines the observed state of EnvoyProxy.
type EnvoyProxyStatus struct {
	// Undefined by this design spec.
}
The EnvoyProxySpec and EnvoyProxyStatus fields will be defined in the future as proxy infrastructure configuration use
cases are better understood.
Data Plane Configuration
GatewayClass and Gateway resources define the data plane infrastructure. Note that all examples assume Envoy Gateway is
running with the Kubernetes provider.
apiVersion: gateway.networking.k8s.io/v1beta1
kind: GatewayClass
metadata:
  name: example-class
spec:
  controllerName: gateway.envoyproxy.io/gatewayclass-controller
---
apiVersion: gateway.networking.k8s.io/v1beta1
kind: Gateway
metadata:
  name: example-gateway
spec:
  gatewayClassName: example-class
  listeners:
  - name: http
    protocol: HTTP
    port: 80
Since the GatewayClass does not define spec.parametersRef, the data plane is provisioned using default configuration
parameters. The Envoy proxies will be configured with a http listener and a Kubernetes LoadBalancer service listening
on port 80.
The following example will configure the data plane to use a ClusterIP service instead of the default LoadBalancer
service:
apiVersion: gateway.networking.k8s.io/v1beta1
kind: GatewayClass
metadata:
  name: example-class
spec:
  controllerName: gateway.envoyproxy.io/gatewayclass-controller
  parametersRef:
    name: example-config
    group: config.gateway.envoyproxy.io
    kind: EnvoyProxy
---
apiVersion: gateway.networking.k8s.io/v1beta1
kind: Gateway
metadata:
  name: example-gateway
spec:
  gatewayClassName: example-class
  listeners:
  - name: http
    protocol: HTTP
    port: 80
---
apiVersion: config.gateway.envoyproxy.io/v1alpha1
kind: EnvoyProxy
metadata:
  name: example-config
spec:
  networkPublishing:
    type: ClusterIPService
Note: The NetworkPublishing API is currently undefined and is provided here for illustration purposes only.
1.6 - Gateway API Support
As mentioned in the system design document, Envoy Gateway’s managed data plane is configured dynamically through
Kubernetes resources, primarily Gateway API objects. Envoy Gateway supports configuration using the following Gateway API resources.
GatewayClass
A GatewayClass represents a “class” of gateways, i.e. which Gateways should be managed by Envoy Gateway.
Envoy Gateway supports managing a single GatewayClass resource that matches its configured controllerName and
follows Gateway API guidelines for resolving conflicts when multiple GatewayClasses exist with a matching
controllerName.
Note: If specifying GatewayClass parameters reference, it must refer to an EnvoyProxy resource.
Gateway
When a Gateway resource is created that references the managed GatewayClass, Envoy Gateway will create and manage a
new Envoy Proxy deployment. Gateway API resources that reference this Gateway will configure this managed Envoy Proxy
deployment.
Note: Envoy Gateway does not support multiple certificate references or specifying an address for the Gateway.
HTTPRoute
An HTTPRoute configures routing of HTTP traffic through one or more Gateways. The following HTTPRoute filters are
supported by Envoy Gateway:
requestHeaderModifier: RequestHeaderModifiers
can be used to modify or add request headers before the request is proxied to its destination.responseHeaderModifier: ResponseHeaderModifiers
can be used to modify or add response headers before the response is sent back to the client.requestMirror: RequestMirrors
configure destinations where the requests should also be mirrored to. Responses to mirrored requests will be ignored.requestRedirect: RequestRedirects
configure policied for how requests that match the HTTPRoute should be modified and then redirected.urlRewrite: UrlRewrites
allow for modification of the request’s hostname and path before it is proxied to its destination.extensionRef: ExtensionRefs are used by Envoy Gateway to implement extended filters. Currently, Envoy Gateway
supports rate limiting and request authentication filters. For more information about these filters, refer to the
rate limiting and request authentication documentation.
Notes:
- The only BackendRef kind supported by Envoy Gateway is a Service. Routing traffic to other destinations such
as arbitrary URLs is not possible.
- The
filters field within HTTPBackendRef is not supported.
TCPRoute
A TCPRoute configures routing of raw TCP traffic through one or more Gateways. Traffic can be forwarded to the
desired BackendRefs based on a TCP port number.
Note: A TCPRoute only supports proxying in non-transparent mode, i.e. the backend will see the source IP and port of
the Envoy Proxy instance instead of the client.
UDPRoute
A UDPRoute configures routing of raw UDP traffic through one or more Gateways. Traffic can be forwarded to the
desired BackendRefs based on a UDP port number.
Note: Similar to TCPRoutes, UDPRoutes only support proxying in non-transparent mode i.e. the backend will see the
source IP and port of the Envoy Proxy instance instead of the client.
GRPCRoute
A GRPCRoute configures routing of gRPC requests through one or more Gateways. They offer request matching by
hostname, gRPC service, gRPC method, or HTTP/2 Header. Envoy Gateway supports the following filters on GRPCRoutes to
provide additional traffic processing:
requestHeaderModifier: RequestHeaderModifiers
can be used to modify or add request headers before the request is proxied to its destination.responseHeaderModifier: ResponseHeaderModifiers
can be used to modify or add response headers before the response is sent back to the client.requestMirror: RequestMirrors
configure destinations where the requests should also be mirrored to. Responses to mirrored requests will be ignored.
Notes:
- The only BackendRef kind supported by Envoy Gateway is a Service. Routing traffic to other
destinations such as arbitrary URLs is not currently possible.
- The
filters field within HTTPBackendRef is not supported.
TLSRoute
A TLSRoute configures routing of TCP traffic through one or more Gateways. However, unlike TCPRoutes, TLSRoutes
can match against TLS-specific metadata.
ReferenceGrant
A ReferenceGrant is used to allow a resource to reference another resource in a different namespace. Normally an
HTTPRoute created in namespace foo is not allowed to reference a Service in namespace bar. A ReferenceGrant permits
these types of cross-namespace references. Envoy Gateway supports the following ReferenceGrant use-cases:
- Allowing an HTTPRoute, GRPCRoute, TLSRoute, UDPRoute, or TCPRoute to reference a Service in a different namespace.
- Allowing an HTTPRoute’s
requestMirror filter to include a BackendRef that references a Service in a different
namespace. - Allowing a Gateway’s SecretObjectReference to reference a secret in a different namespace.
1.7 - Introduce egctl
Motivation
EG should provide a command line tool with following capabilities:
- Collect configuration from envoy proxy and gateway
- Analyse system configuration to diagnose any issues in envoy gateway
This tool is named egctl.
Syntax
Use the following syntax to run egctl commands from your terminal window:
egctl [command] [entity] [name] [flags]
where command, name, and flags are:
command: Specifies the operation that you want to perform on one or more resources,
for example config, version.
entity: Specifies the entity the operation is being performed on such as envoy-proxy or envoy-gateway.
name: Specifies the name of the specified instance.
flags: Specifies optional flags. For example, you can use the -c or --config flags to specify the values for installing.
If you need help, run egctl help from the terminal window.
Operation
The following table includes short descriptions and the general syntax for all the egctl operations:
| Operation | Syntax | Description |
|---|
version | egctl version | Prints out build version information. |
config | egctl config ENTITY | Retrieve information about proxy configuration from envoy proxy and gateway |
analyze | egctl analyze | Analyze EG configuration and print validation messages |
Examples
Use the following set of examples to help you familiarize yourself with running the commonly used egctl operations:
# Retrieve all information about proxy configuration from envoy
egctl config envoy-proxy all <instance_name>

# Retrieve listener information about proxy configuration from envoy
egctl config envoy-proxy listener <instance_name>

# Retrieve information about envoy gateway
egctl config envoy-gateway
1.8 - Rate Limit Design
Overview
Rate limit is a feature that allows the user to limit the number of incoming requests
to a predefined value based on attributes within the traffic flow.
Here are some reasons why a user may want to implements Rate limits
- To prevent malicious activity such as DDoS attacks.
- To prevent applications and its resources (such as a database) from getting overloaded.
- To create API limits based on user entitlements.
Scope Types
The rate limit type here describes the scope of rate limits.
Global - In this case, the rate limit is common across all the instances of Envoy proxies
where its applied i.e. if the data plane has 2 replicas of Envoy running, and the rate limit is
10 requests/second, this limit is common and will be hit if 5 requests pass through the first replica
and 5 requests pass through the second replica within the same second.
Local - In this case, the rate limits are specific to each instance/replica of Envoy running.
Note - This is not part of the initial design and will be added as a future enhancement.
Match Types
Rate limit a specific traffic flow
- Here is an example of a ratelimit implemented by the application developer to limit a specific user
by matching on a custom
x-user-id header with a value set to one
apiVersion: gateway.envoyproxy.io/v1alpha1
kind: RateLimitFilter
metadata:
  name: ratelimit-specific-user
spec:
  type: Global
  global:
    rules:
    - clientSelectors:
      - headers:
        - name: x-user-id
          value: one
      limit:
        requests: 10
        unit: Hour
---
apiVersion: gateway.networking.k8s.io/v1beta1
kind: HTTPRoute
metadata:
  name: example
spec:
  parentRefs:
  - name: eg
  hostnames:
  - www.example.com
  rules:
  - matches:
    - path:
        type: PathPrefix
        value: /foo
    filters:
    - type: ExtensionRef
      extensionRef:
        group: gateway.envoyproxy.io
        kind: RateLimitFilter
        name: ratelimit-specific-user
    backendRefs:
    - name: backend
      port: 3000
Rate limit all traffic flows
- Here is an example of a rate limit implemented by the application developer that limits the total requests made
to a specific route to safeguard health of internal application components. In this case, no specific
headers match
is specified, and the rate limit is applied to all traffic flows accepted by this HTTPRoute.
apiVersion: gateway.envoyproxy.io/v1alpha1
kind: RateLimitFilter
metadata:
  name: ratelimit-all-requests
spec:
  type: Global
  global:
    rules:
    - limit:
        requests: 1000
        unit: Second
---
apiVersion: gateway.networking.k8s.io/v1beta1
kind: HTTPRoute
metadata:
  name: example
spec:
  parentRefs:
  - name: eg
  hostnames:
  - www.example.com
  rules:
  - matches:
    - path:
        type: PathPrefix
        value: /foo
    filters:
    - type: ExtensionRef
      extensionRef:
        group: gateway.envoyproxy.io
        kind: RateLimitFilter
        name: ratelimit-all-requests
    backendRefs:
    - name: backend
      port: 3000
Rate limit per distinct value
- Here is an example of a rate limit implemented by the application developer to limit any unique user
by matching on a custom
x-user-id header. Here, user A (recognised from the traffic flow using the header
x-user-id and value a) will be rate limited at 10 requests/hour and so will user B
(recognised from the traffic flow using the header x-user-id and value b).
apiVersion: gateway.envoyproxy.io/v1alpha1
kind: RateLimitFilter
metadata:
  name: ratelimit-per-user
spec:
  type: Global
  global:
    rules:
    - clientSelectors:
      - headers:
        - type: Distinct
          name: x-user-id
      limit:
        requests: 10
        unit: Hour
---
apiVersion: gateway.networking.k8s.io/v1beta1
kind: HTTPRoute
metadata:
  name: example
spec:
  parentRefs:
  - name: eg
  hostnames:
  - www.example.com
  rules:
  - matches:
    - path:
        type: PathPrefix
        value: /foo
    filters:
    - type: ExtensionRef
      extensionRef:
        group: gateway.envoyproxy.io
        kind: RateLimitFilter
        name: ratelimit-per-user
    backendRefs:
    - name: backend
      port: 3000
Multiple RateLimitFilters, rules and clientSelectors
- Users can create multiple
RateLimitFilters and apply it to the same HTTPRoute. In such a case each
RateLimitFilter will be applied to the route and matched (and limited) in a mutually exclusive way, independent of each other. - Rate limits are applied for each
RateLimitFilter rule when ALL the conditions under clientSelectors hold true.
Here’s an example highlighting this -
apiVersion: gateway.envoyproxy.io/v1alpha1
kind: RateLimitFilter
metadata:
  name: ratelimit-all-safeguard-app
spec:
  type: Global
  global:
    rules:
    - limit:
        requests: 100
        unit: Second
---

apiVersion: gateway.envoyproxy.io/v1alpha1
kind: RateLimitFilter
metadata:
  name: ratelimit-per-user
spec:
  type: Global
  global:
    rules:
    - clientSelectors:
      - headers:
        - type: Distinct
          name: x-user-id
      limit:
        requests: 1000
        unit: Hour
---
apiVersion: gateway.networking.k8s.io/v1beta1
kind: HTTPRoute
metadata:
  name: example
spec:
  parentRefs:
  - name: eg
  hostnames:
  - www.example.com
  rules:
  - matches:
    - path:
        type: PathPrefix
        value: /foo
    filters:
    - type: ExtensionRef
      extensionRef:
        group: gateway.envoyproxy.io
        kind: RateLimitFilter
        name: ratelimit-per-user
    - type: ExtensionRef
      extensionRef:
        group: gateway.envoyproxy.io
        kind: RateLimitFilter
        name: ratelimit-all-safeguard-app
    backendRefs:
    - name: backend
      port: 3000
- The user has created two
RateLimitFilters and has attached it to a HTTPRoute - one(ratelimit-all-safeguard-app) to
ensure that the backend does not get overwhelmed with requests, any excess requests are rate limited irrespective of
the attributes within the traffic flow, and another(ratelimit-per-user) to rate limit each distinct user client
who can be differentiated using the x-user-id header, to ensure that each client does not make exessive requests to the backend. - If user
baz (identified with the header and value of x-user-id: baz) sends 90 requests within the first second, and
user bar sends 11 more requests during that same interval of 1 second, and user bar sends the 101th request within that second,
the rule defined in ratelimit-all-safeguard-app gets activated and Envoy Gateway will ratelimit the request sent by bar (and any other
request sent within that 1 second). After 1 second, the rate limit counter associated with the ratelimit-all-safeguard-app rule
is reset and again evaluated. - If user
bar also ends up sending 90 more requests within the hour, summing up bar’s total request count to 101, the rate limit rule
defined within ratelimit-per-user will get activated, and bar’s requests will be rate limited again until the hour interval ends. - Within the same above hour, if
baz sends 991 more requests, summing up baz’s total request count to 1001, the rate limit rule defined
within ratelimit-per-user will get activated for baz, and baz’s requests will also be rate limited until the hour interval ends.
Design Decisions
- The initial design uses an Extension filter to apply the Rate Limit functionality on a specific HTTPRoute.
This was preferred over the PolicyAttachment extension mechanism, because it is unclear whether Rate Limit
will be required to be enforced or overridden by the platform administrator or not.
- The RateLimitFilter can only be applied as a filter to a [HTTPRouteRule[], applying it across all backends within a HTTPRoute
and cannot be applied a filter within a HTTPBackendRef for a specific backend.
- The HTTPRoute API has a matches field within each rule to select a specific traffic flow to be routed to
the destination backend. The RateLimitFilter API that can be attached to an HTTPRoute via an extensionRef filter,
also has a
clientSelectors field within each rule to select attributes within the traffic flow to rate limit specific clients.
The two levels of selectors/matches allow for flexibility and aim to hold match information specific to its use, allowing the author/owner
of each configuration to be different. It also allows the clientSelectors field within the RateLimitFilter to be enhanced with other matchable
attribute such as IP subnet in the future that are not relevant in the HTTPRoute API.
Implementation Details
Global Rate limiting
- Global rate limiting in Envoy Proxy can be achieved using the following -
- Actions can be configured per xDS Route.
- If the match criteria defined within these actions is met for a specific HTTP Request, a set of key value pairs called descriptors
defined within the above actions is sent to a remote rate limit service, whose configuration (such as the URL for the rate limit service) is defined
using a rate limit filter.
- Based on information received by the rate limit service and its programmed configuration, a decision is computed, whether to rate limit
the HTTP Request or not, and is sent back to Envoy, which enforces this decision on the data plane.
- Envoy Gateway will leverage this Envoy Proxy feature by -
- Translating the user facing RateLimitFilter API into Rate limit Actions as well as Rate limit service configuration to implement
the desired API intent.
- Envoy Gateway will use the existing reference implementation of the rate limit service.
- The Infrastructure administrator will need to enable the rate limit service using new settings that will be defined in the EnvoyGateway config API.
- The xDS IR will be enhanced to hold the user facing rate limit intent.
- The xDS Translator will be enhanced to translate the rate limit field within the xDS IR into Rate limit Actions as well as instantiate the rate limit filter.
- A new runner called
rate-limit will be added that subscribes to the xDS IR messages and translates it into a new Rate Limit Infra IR which contains
the rate limit service configuration as well as other information needed to deploy the rate limit service. - The infrastructure service will be enhanced to subscribe to the Rate Limit Infra IR and deploy a provider specific rate limit service runnable entity.
- A Status field within the RateLimitFilter API will be added to reflect whether the specific configuration was programmed correctly in these multiple locations or not.
1.9 - Request Authentication
Overview
Issue 336 specifies the need for exposing a user-facing API to configure request authentication. Request
authentication is defined as an authentication mechanism to be enforced by Envoy on a per-request basis. A connection
will be rejected if it contains invalid authentication information, based on the AuthenticationFilter API type
proposed in this design document.
Envoy Gateway leverages Gateway API for configuring managed Envoy proxies. Gateway API defines core, extended, and
implementation-specific API support levels for implementers such as Envoy Gateway to expose features. Since
implementing request authentication is not covered by Core or Extended APIs, an Implementation-specific API will
be created for this purpose.
Goals
- Define an API for configuring request authentication.
- Implement JWT as the first supported authentication type.
- Allow users that manage routes, e.g. HTTPRoute, to authenticate matching requests before forwarding to a backend
service.
- Support HTTPRoutes as an Authentication API referent. HTTPRoute provides multiple extension points. The
HTTPRouteFilter is the extension point supported by the Authentication API.
Non-Goals
- Allow infrastructure administrators to override or establish default authentication policies.
- Support referents other than HTTPRoute.
- Support Gateway API extension points other than HTTPRouteFilter.
Use-Cases
These use-cases are presented as an aid for how users may attempt to utilize the outputs of the design. They are not an
exhaustive list of features for authentication support in Envoy Gateway.
As a Service Producer, I need the ability to:
- Authenticate a request before forwarding it to a backend service.
- Have different authentication mechanisms per route rule.
- Choose from different authentication mechanisms supported by Envoy, e.g. OIDC.
Authentication API Type
The Authentication API type defines authentication configuration for authenticating requests through managed Envoy
proxies.
package v1alpha1

import (
	metav1 "k8s.io/apimachinery/pkg/apis/meta/v1"

)

type AuthenticationFilter struct {
	metav1.TypeMeta
	metav1.ObjectMeta

	// Spec defines the desired state of the Authentication type.
	Spec AuthenticationFilterSpec

	// Note: The status sub-resource has been excluded but may be added in the future.
}

// AuthenticationFilterSpec defines the desired state of the AuthenticationFilter type.
// +union
type AuthenticationFilterSpec struct {
	// Type defines the type of authentication provider to use. Supported provider types are:
	//
	// * JWT: A provider that uses JSON Web Token (JWT) for authenticating requests.
	//
	// +unionDiscriminator
	Type AuthenticationFilterType

	// JWT defines the JSON Web Token (JWT) authentication provider type. When multiple
	// jwtProviders are specified, the JWT is considered valid if any of the providers
	// successfully validate the JWT.
	JwtProviders []JwtAuthenticationFilterProvider
}

...
Refer to PR 773 for the detailed AuthenticationFilter API spec.
The status subresource is not included in the AuthenticationFilter API. Status will be surfaced by an HTTPRoute that
references an AuthenticationFilter. For example, an HTTPRoute will surface the ResolvedRefs=False status condition if it
references an AuthenticationFilter that does not exist. It may be beneficial to add AuthenticationFilter status fields in the future
based on defined use-cases. For example, a remote JWKS can be validated based on the specified URI and have an
appropriate status condition surfaced.
AuthenticationFilter Example
The following is an AuthenticationFilter example with one JWT authentication provider:
apiVersion: gateway.envoyproxy.io/v1alpha1
kind: AuthenticationFilter
metadata:
  name: example
spec:
  type: JWT
  jwtProviders:
  - name: example
    issuer: https://www.example.com
    audiences:
    - foo.com
    remoteJwks:
      uri: https://foo.com/jwt/public-key/jwks.json
      <TBD>
Note: type is a union type, allowing only one of any supported provider type such as jwtProviders to be
specified.
The following is an example HTTPRoute configured to use the above JWT authentication provider:
apiVersion: gateway.networking.k8s.io/v1beta1
kind: HTTPRoute
metadata:
  name: example
spec:
  parentRefs:
    - name: eg
  hostnames:
    - www.example.com
  rules:
    - matches:
        - path:
            type: PathPrefix
            value: /foo
      filters:
        - type: ExtensionRef
          extensionRef:
            group: gateway.envoyproxy.io
            kind: AuthenticationFilter
            name: example
      backendRefs:
        - name: backend
          port: 3000
Requests for www.example.com/foo will be authenticated using the referenced JWT provider before being forwarded to the
backend service named “backend”.
Implementation Details
The JWT authentication type is translated to an Envoy JWT authentication filter and a cluster is created for each
remote JWKS. The following examples provide additional details on how Gateway API and AuthenticationFilter resources are
translated into Envoy configuration.
Example 1: One Route with One JWT Provider
The following cluster is created from the above HTTPRoute and AuthenticationFilter:
dynamic_clusters:
  - name: foo.com|443
    load_assignment:
      cluster_name: foo.com|443
      endpoints:
        - lb_endpoints:
            - endpoint:
                address:
                  socket_address:
                    address: foo.com
                    port_value: 443
    transport_socket:
      name: envoy.transport_sockets.tls
      typed_config:
        "@type": type.googleapis.com/envoy.extensions.transport_sockets.tls.v3.UpstreamTlsContext
        sni: foo.com
        common_tls_context:
          validation_context:
            match_subject_alt_names:
              - exact: "*.foo.com"
            trusted_ca:
              filename: /etc/ssl/certs/ca-certificates.crt
A JWT authentication HTTP filter is added to the HTTP Connection Manager. For example:
dynamic_resources:
  dynamic_listeners:
    - name: example_listener
      address:
        socket_address:
          address: 1.2.3.4
          port_value: 80
      filter_chains:
        - filters:
            - name: envoy.http_connection_manager
          http_filters:
          - name: envoy.filters.http.jwt_authn
            typed_config:
              "@type": type.googleapis.com/envoy.config.filter.http.jwt_authn.v2alpha.JwtAuthentication
This JWT authentication HTTP filter contains two fields:
- The
providers field specifies how a JWT should be verified, such as where to extract the token, where to fetch the
public key (JWKS) and where to output its payload. This field is built from the source resource namespace-name, and
the JWT provider name of an AuthenticationFilter. - The
rules field specifies matching rules and their requirements. If a request matches a rule, its requirement
applies. The requirement specifies which JWT providers should be used. This field is built from a HTTPRoute
matches rule that references the AuthenticationFilter. When a referenced Authentication specifies multiple
jwtProviders, the JWT is considered valid if any of the providers successfully validate the JWT.
The following JWT authentication HTTP filter providers configuration is created from the above AuthenticationFilter.
providers:
   example:
     issuer: https://www.example.com
     audiences:
     - foo.com
     remote_jwks:
       http_uri:
         uri: https://foo.com/jwt/public-key/jwks.json
         cluster: example_jwks_cluster
         timeout: 1s
The following JWT authentication HTTP filter rules configuration is created from the above HTTPRoute.
rules:
  - match:
      prefix: /foo
    requires:
      provider_name: default-example-example
Example 2: Two HTTPRoutes with Different AuthenticationFilters
The following example contains:
- Two HTTPRoutes with different hostnames.
- Each HTTPRoute references a different AuthenticationFilter.
- Each AuthenticationFilter contains a different JWT provider.
apiVersion: gateway.envoyproxy.io/v1alpha1
kind: AuthenticationFilter
metadata:
  name: example1
spec:
  type: JWT
  jwtProviders:
  - name: example1
    issuer: https://www.example1.com
    audiences:
    - foo.com
    remoteJwks:
      uri: https://foo.com/jwt/public-key/jwks.json
---
apiVersion: gateway.envoyproxy.io/v1alpha1
kind: AuthenticationFilter
metadata:
  name: example2
spec:
  type: JWT
  jwtProviders:
    - name: example2
      issuer: https://www.example2.com
      audiences:
        - bar.com
      remoteJwks:
        uri: https://bar.com/jwt/public-key/jwks.json
---
apiVersion: gateway.networking.k8s.io/v1beta1
kind: HTTPRoute
metadata:
  name: example1
spec:
  hostnames:
    - www.example1.com
  parentRefs:
    - group: gateway.networking.k8s.io
      kind: Gateway
      name: eg
  rules:
    - matches:
        - path:
            type: PathPrefix
            value: /foo
      filters:
        - type: ExtensionRef
          extensionRef:
            group: gateway.envoyproxy.io
            kind: AuthenticationFilter
            name: example1
      backendRefs:
        - name: backend
          port: 3000
---
apiVersion: gateway.networking.k8s.io/v1beta1
kind: HTTPRoute
metadata:
  name: example2
spec:
  hostnames:
    - www.example2.com
  parentRefs:
    - group: gateway.networking.k8s.io
      kind: Gateway
      name: eg
  rules:
    - matches:
        - path:
            type: PathPrefix
            value: /bar
      filters:
        - type: ExtensionRef
          extensionRef:
            group: gateway.envoyproxy.io
            kind: AuthenticationFilter
            name: example2
      backendRefs:
        - name: backend2
          port: 3000
The following xDS configuration is created from the above example resources:
configs:
...
dynamic_listeners:
  - name: default-eg-http
    ...
        default_filter_chain:
          filters:
          - name: envoy.filters.network.http_connection_manager
            typed_config:
              '@type': >-
                type.googleapis.com/envoy.extensions.filters.network.http_connection_manager.v3.HttpConnectionManager
              stat_prefix: http
              rds:
                config_source:
                  ...
                route_config_name: default-eg-http
              http_filters:
                - name: envoy.filters.http.jwt_authn
                  typed_config:
                    '@type': >-
                      type.googleapis.com/envoy.config.filter.http.jwt_authn.v2alpha.JwtAuthentication
                    providers:
                      default-example1-example1:
                        issuer: https://www.example1.com
                        audiences:
                          - foo.com
                        remote_jwks:
                          http_uri:
                            uri: https://foo.com/jwt/public-key/jwks.json
                            cluster: default-example1-example1-jwt
                      default-example2-example2:
                        issuer: https://www.example2.com
                        audiences:
                          - bar.com
                        remote_jwks:
                          http_uri:
                            uri: https://bar.com/jwt/public-key/jwks.json
                            cluster: default-example2-example2-jwt
                    rules:
                      - match:
                          exact: /foo
                        requires:
                          provider_name: default-example1-example1
                      - match:
                          exact: /bar
                        requires:
                          provider_name: default-example2-example2
                - name: envoy.filters.http.router
                  typed_config:
                    '@type': >-
                      type.googleapis.com/envoy.extensions.filters.http.router.v3.Router
dynamic_route_configs:
  - route_config:
      '@type': type.googleapis.com/envoy.config.route.v3.RouteConfiguration
      name: default-eg-http
      virtual_hosts:
        - name: default-eg-http
          domains:
            - '*'
          routes:
            - match:
                prefix: /foo
                headers:
                  - name: ':authority'
                    string_match:
                      exact: www.example1.com
              route:
                cluster: default-backend-rule-0-match-0-www.example1.com
            - match:
                prefix: /bar
                headers:
                  - name: ':authority'
                    string_match:
                      exact: www.example2.com
              route:
                cluster: default-backend2-rule-0-match-0-www.example2.com
dynamic_active_clusters:
  - cluster:
      name: default-backend-rule-0-match-0-www.example.com
      ...
        endpoints:
        - locality: {}
          lb_endpoints:
            - endpoint:
                address:
                  socket_address:
                    address: $BACKEND_SERVICE1_IP
                    port_value: 3000
  - cluster:
      '@type': type.googleapis.com/envoy.config.cluster.v3.Cluster
      name: default-backend-rule-1-match-0-www.example.com
      ...
        endpoints:
        - locality: {}
          lb_endpoints:
            - endpoint:
                address:
                  socket_address:
                    address: $BACKEND_SERVICE2_IP
                    port_value: 3000
...
Note: The JWT provider cluster and route is omitted from the above example for brevity.
Implementation Outline
- Update the Kubernetes provider to get/watch AuthenticationFilter resources that are referenced by managed HTTPRoutes.
Add the referenced AuthenticationFilter object to the resource map and publish it.
- Update the resource translator to include the AuthenticationFilter API in HTTPRoute processing.
- Update the xDS translator to translate an AuthenticationFilter into xDS resources. The translator should perform the
following:
- Convert a list of JWT rules from the xds IR into an Envoy JWT filter config.
- Create a JWT authentication HTTP filter.
- Build the HTTP Connection Manager (HCM) HTTP filters.
- Build the HCM.
- When building the Listener, create an HCM for each filter-chain.
Adding Authentication Types
Additional authentication types can be added in the future through the AuthenticationFilterType API. For
example, to add the Foo authentication type:
Define the Foo authentication provider:
package v1alpha1

// FooAuthenticationFilterProvider defines the "Foo" authentication filter provider type.
type FooAuthenticationFilterProvider struct {
	// TODO: Define fields of the Foo authentication filter provider type.
}
Add the FooAuthenticationFilterProvider type to AuthenticationFilterSpec:
package v1alpha1

type AuthenticationFilterSpec struct {
	...

	// Foo defines the Foo authentication type. For additional
	// details, see:
	//
	//   <INSERT_LINK>
	//
	// +optional
	Foo *FooAuthenticationFilterProvider
}
Lastly, add the type to the AuthenticationType enum:
// AuthenticationType is a type of authentication provider.
// +kubebuilder:validation:Enum=JWT,FOO
type AuthenticationFilterType string

const (
	// JwtAuthenticationProviderType is the JWT authentication provider type.
	FooAuthenticationFilterProviderType AuthenticationFilterType = "FOO"
)
The AuthenticationFilter API should support additional authentication types in the future, for example:
Outstanding Questions
- If Envoy Gateway owns the AuthenticationFilter API, is an xDS IR equivalent needed?
- Should local JWKS be implemented before remote JWKS?
- How should Envoy obtain the trusted CA for a remote JWKS?
- Should HTTPS be the only supported scheme for remote JWKS?
- Should OR’ing JWT providers be supported?
- Should Authentication provide status?
- Are the API field validation rules acceptable?
1.10 - TCP and UDP Proxy Design
Even though most of the use cases for Envoy Gateway are at Layer-7, Envoy Gateway can also work at Layer-4 to proxy TCP
and UDP traffic. This document will explore the options we have when operating Envoy Gateway at Layer-4 and explain the
design decision.
Envoy can work as a non-transparent proxy or a transparent proxy for both TCP
and UDP
, so ideally, Envoy Gateway should also be able to work in these two modes:
Non-transparent Proxy Mode
For TCP, Envoy terminates the downstream connection, connects the upstream with its own IP address, and proxies the
TCP traffic from the downstream to the upstream.
For UDP, Envoy receives UDP datagrams from the downstream, and uses its own IP address as the sender IP address when
proxying the UDP datagrams to the upstream.
In this mode, the upstream will see Envoy’s IP address and port.
Transparent Proxy Mode
For TCP, Envoy terminates the downstream connection, connects the upstream with the downstream IP address, and proxies
the TCP traffic from the downstream to the upstream.
For UDP, Envoy receives UDP datagrams from the downstream, and uses the downstream IP address as the sender IP address
when proxying the UDP datagrams to the upstream.
In this mode, the upstream will see the original downstream IP address and Envoy’s mac address.
Note: Even in transparent mode, the upstream can’t see the port number of the downstream because Envoy doesn’t forward
the port number.
The Implications of Transparent Proxy Mode
Escalated Privilege
Envoy needs to bind to the downstream IP when connecting to the upstream, which means Envoy requires escalated
CAP_NET_ADMIN privileges. This is often considered as a bad security practice and not allowed in some sensitive deployments.
Routing
The upstream can see the original source IP, but the original port number won’t be passed, so the return
traffic from the upstream must be routed back to Envoy because only Envoy knows how to send the return traffic back
to the right port number of the downstream, which requires routing at the upstream side to be set up.
In a Kubernetes cluster, Envoy Gateway will have to carefully cooperate with CNI plugins to get the routing right.
The Design Decision (For Now)
The implementation will only support proxying in non-transparent mode i.e. the backend will see the source IP and
port of the deployed Envoy instance instead of the client.
2 - User Guides
This section includes User Guides of Envoy Gateway.
2.1 - Quickstart
This guide will help you get started with Envoy Gateway in a few simple steps.
Prerequisites
A Kubernetes cluster.
Note: Refer to the Compatibility Matrix for supported Kubernetes versions.
Installation
Install the Gateway API CRDs and Envoy Gateway:
kubectl apply -f https://github.com/envoyproxy/gateway/releases/download/v0.3.0/install.yaml
Wait for Envoy Gateway to become available:
kubectl wait --timeout=5m -n envoy-gateway-system deployment/envoy-gateway --for=condition=Available
Install the GatewayClass, Gateway, HTTPRoute and example app:
kubectl apply -f https://github.com/envoyproxy/gateway/releases/download/v0.3.0/quickstart.yaml
Note: quickstart.yaml defines that Envoy Gateway will listen for
traffic on port 80 on its globally-routable IP address, to make it easy to use
browsers to test Envoy Gateway. When Envoy Gateway sees that its Listener is
using a privileged port (<1024), it will map this internally to an
unprivileged port, so that Envoy Gateway doesn’t need additional privileges.
It’s important to be aware of this mapping, since you may need to take it into
consideration when debugging.
Testing the Configuration
Get the name of the Envoy service created the by the example Gateway:
export ENVOY_SERVICE=$(kubectl get svc -n envoy-gateway-system --selector=gateway.envoyproxy.io/owning-gateway-namespace=default,gateway.envoyproxy.io/owning-gateway-name=eg -o jsonpath='{.items[0].metadata.name}')
Port forward to the Envoy service:
kubectl -n envoy-gateway-system port-forward service/${ENVOY_SERVICE} 8888:80 &
Curl the example app through Envoy proxy:
curl --verbose --header "Host: www.example.com" http://localhost:8888/get
External LoadBalancer Support
You can also test the same functionality by sending traffic to the External IP. To get the external IP of the
Envoy service, run:
export GATEWAY_HOST=$(kubectl get svc/${ENVOY_SERVICE} -n envoy-gateway-system -o jsonpath='{.status.loadBalancer.ingress[0].ip}')
In certain environments, the load balancer may be exposed using a hostname, instead of an IP address. If so, replace
ip in the above command with hostname.
Curl the example app through Envoy proxy:
curl --verbose --header "Host: www.example.com" http://$GATEWAY_HOST/get
Clean-Up
Use the steps in this section to uninstall everything from the quickstart guide.
Delete the GatewayClass, Gateway, HTTPRoute and Example App:
kubectl delete -f https://github.com/envoyproxy/gateway/releases/download/v0.3.0/quickstart.yaml --ignore-not-found=true
Delete the Gateway API CRDs and Envoy Gateway:
kubectl delete -f https://github.com/envoyproxy/gateway/releases/download/v0.3.0/install.yaml --ignore-not-found=true
Next Steps
Checkout the Developer Guide to get involved in the project.
2.2 - GRPC Routing
The GRPCRoute resource allows users to configure gRPC routing by matching HTTP/2 traffic and forwarding it to backend gRPC servers.
To learn more about gRPC routing, refer to the Gateway API documentation.
Prerequisites
Install Envoy Gateway:
kubectl apply -f https://github.com/envoyproxy/gateway/releases/download/v0.3.0/install.yaml
Wait for Envoy Gateway to become available:
kubectl wait --timeout=5m -n envoy-gateway-system deployment/envoy-gateway --for=condition=Available
Installation
Install the gRPC routing example resources:
kubectl apply -f https://raw.githubusercontent.com/envoyproxy/gateway/v0.3.0/examples/kubernetes/grpc-routing.yaml
The manifest installs a GatewayClass, Gateway, a Deployment, a Service, and a GRPCRoute resource.
The GatewayClass is a cluster-scoped resource that represents a class of Gateways that can be instantiated.
Note: Envoy Gateway is configured by default to manage a GatewayClass with
controllerName: gateway.envoyproxy.io/gatewayclass-controller.
Verification
Check the status of the GatewayClass:
kubectl get gc --selector=example=grpc-routing
The status should reflect “Accepted=True”, indicating Envoy Gateway is managing the GatewayClass.
A Gateway represents configuration of infrastructure. When a Gateway is created, Envoy proxy infrastructure is
provisioned or configured by Envoy Gateway. The gatewayClassName defines the name of a GatewayClass used by this
Gateway. Check the status of the Gateway:
kubectl get gateways --selector=example=grpc-routing
The status should reflect “Ready=True”, indicating the Envoy proxy infrastructure has been provisioned. The status also
provides the address of the Gateway. This address is used later in the guide to test connectivity to proxied backend
services.
Check the status of the GRPCRoute:
kubectl get grpcroutes --selector=example=grpc-routing -o yaml
The status for the GRPCRoute should surface “Accepted=True” and a parentRef that references the example Gateway.
The example-route matches any traffic for “grpc-example.com” and forwards it to the “yages” Service.
Testing the Configuration
Before testing GRPC routing to the yages backend, get the Gateway’s address.
export GATEWAY_HOST=$(kubectl get gateway/example-gateway -o jsonpath='{.status.addresses[0].value}')
Test GRPC routing to the yages backend using the grpcurl command.
grpcurl -plaintext -authority=grpc-example.com ${GATEWAY_HOST}:80 yages.Echo/Ping
You should see the below response
Envoy Gateway also supports gRPC-Web requests for this configuration. The below curl command can be used to send a grpc-Web request with over HTTP/2. You should receive the same response seen in the previous command.
curl --http2-prior-knowledge -s ${GATEWAY_HOST}:80/yages.Echo/Ping -H 'Host: grpc-example.com' -H 'Content-Type: application/grpc-web-text' -H 'Accept: application/grpc-web-text' -XPOST -d'AAAAAAA=' | base64 -d
2.3 - HTTP Redirects
The HTTPRoute resource can issue redirects to clients or rewrite paths sent upstream using filters. Note that
HTTPRoute rules cannot use both filter types at once. Currently, Envoy Gateway only supports core
HTTPRoute filters which consist of RequestRedirect and RequestHeaderModifier at the time of this writing. To
learn more about HTTP routing, refer to the Gateway API documentation.
Prerequisites
Follow the steps from the Secure Gateways to install Envoy Gateway and the example manifest.
Before proceeding, you should be able to query the example backend using HTTPS.
Redirects
Redirects return HTTP 3XX responses to a client, instructing it to retrieve a different resource. A
RequestRedirect filter instructs Gateways to emit a redirect response to requests that match the rule.
For example, to issue a permanent redirect (301) from HTTP to HTTPS, configure requestRedirect.statusCode=301 and
requestRedirect.scheme="https":
cat <<EOF | kubectl apply -f -
apiVersion: gateway.networking.k8s.io/v1beta1
kind: HTTPRoute
metadata:
  name: http-to-https-filter-redirect
spec:
  parentRefs:
    - name: eg
  hostnames:
    - redirect.example
  rules:
    - filters:
      - type: RequestRedirect
        requestRedirect:
          scheme: https
          statusCode: 301
          hostname: www.example.com
          port: 443
      backendRefs:
      - name: backend
        port: 3000
EOF
Note: 301 (default) and 302 are the only supported statusCodes.
The HTTPRoute status should indicate that it has been accepted and is bound to the example Gateway.
kubectl get httproute/http-to-https-filter-redirect -o yaml
Get the Gateway’s address:
export GATEWAY_HOST=$(kubectl get gateway/eg -o jsonpath='{.status.addresses[0].value}')
Querying redirect.example/get should result in a 301 response from the example Gateway and redirecting to the
configured redirect hostname.
$ curl -L -vvv --header "Host: redirect.example" "http://${GATEWAY_HOST}/get"
...
< HTTP/1.1 301 Moved Permanently
< location: https://www.example.com/get
...
If you followed the steps in the Secure Gateways guide, you should be able to curl the redirect
location.
Path Redirects
Path redirects use an HTTP Path Modifier to replace either entire paths or path prefixes. For example, the HTTPRoute
below will issue a 302 redirect to all path.redirect.example requests whose path begins with /get to /status/200.
cat <<EOF | kubectl apply -f -
apiVersion: gateway.networking.k8s.io/v1beta1
kind: HTTPRoute
metadata:
  name: http-filter-path-redirect
spec:
  parentRefs:
    - name: eg
  hostnames:
    - path.redirect.example
  rules:
    - matches:
      - path:
          type: PathPrefix
          value: /get
      filters:
      - type: RequestRedirect
        requestRedirect:
          path:
            type: ReplaceFullPath
            replaceFullPath: /status/200
          statusCode: 302
      backendRefs:
      - name: backend
        port: 3000
EOF
The HTTPRoute status should indicate that it has been accepted and is bound to the example Gateway.
kubectl get httproute/http-filter-path-redirect -o yaml
Querying path.redirect.example should result in a 302 response from the example Gateway and a redirect location
containing the configured redirect path.
Query the path.redirect.example host:
curl -vvv --header "Host: path.redirect.example" "http://${GATEWAY_HOST}/get"
You should receive a 302 with a redirect location of http://path.redirect.example/status/200.
2.4 - HTTP Request Headers
The HTTPRoute resource can modify the headers of a request before forwarding it to the upstream service. HTTPRoute
rules cannot use both filter types at once. Currently, Envoy Gateway only supports core HTTPRoute filters which
consist of RequestRedirect and RequestHeaderModifier at the time of this writing. To learn more about HTTP routing,
refer to the Gateway API documentation.
A RequestHeaderModifier filter instructs Gateways to modify the headers in requests that match the rule
before forwarding the request upstream. Note that the RequestHeaderModifier filter will only modify headers before the
request is sent from Envoy to the upstream service and will not affect response headers returned to the downstream
client.
Prerequisites
Follow the steps from the Quickstart Guide to install Envoy Gateway and the example manifest.
Before proceeding, you should be able to query the example backend using HTTP.
The RequestHeaderModifier filter can add new headers to a request before it is sent to the upstream. If the request
does not have the header configured by the filter, then that header will be added to the request. If the request already
has the header configured by the filter, then the value of the header in the filter will be appended to the value of the
header in the request.
cat <<EOF | kubectl apply -f -
apiVersion: gateway.networking.k8s.io/v1beta1
kind: HTTPRoute
metadata:
  name: http-headers
spec:
  parentRefs:
  - name: eg
  hostnames:
  - headers.example
  rules:
  - matches:
    - path:
        type: PathPrefix
        value: /
    backendRefs:
    - group: ""
      kind: Service
      name: backend
      port: 3000
      weight: 1
    filters:
    - type: RequestHeaderModifier
      requestHeaderModifier:
        add:
        - name: "add-header"
          value: "foo"
EOF
The HTTPRoute status should indicate that it has been accepted and is bound to the example Gateway.
kubectl get httproute/http-headers -o yaml
Get the Gateway’s address:
export GATEWAY_HOST=$(kubectl get gateway/eg -o jsonpath='{.status.addresses[0].value}')
Querying headers.example/get should result in a 200 response from the example Gateway and the output from the
example app should indicate that the upstream example app received the header add-header with the value:
something,foo
$ curl -vvv --header "Host: headers.example" "http://${GATEWAY_HOST}/get" --header "add-header: something"
...
> GET /get HTTP/1.1
> Host: headers.example
> User-Agent: curl/7.81.0
> Accept: */*
> add-header: something
>
* Mark bundle as not supporting multiuse
< HTTP/1.1 200 OK
< content-type: application/json
< x-content-type-options: nosniff
< content-length: 474
< x-envoy-upstream-service-time: 0
< server: envoy
<
...
 "headers": {
  "Accept": [
   "*/*"
  ],
  "Add-Header": [
   "something",
   "foo"
  ],
...
Setting headers is similar to adding headers. If the request does not have the header configured by the filter, then it
will be added, but unlike adding request headers which will append the value of the header if
the request already contains it, setting a header will cause the value to be replaced by the value configured in the
filter.
cat <<EOF | kubectl apply -f -
apiVersion: gateway.networking.k8s.io/v1beta1
kind: HTTPRoute
metadata:
  name: http-headers
spec:
  parentRefs:
  - name: eg
  hostnames:
  - headers.example
  rules:
  - backendRefs:
    - group: ""
      kind: Service
      name: backend
      port: 3000
      weight: 1
    matches:
    - path:
        type: PathPrefix
        value: /
    filters:
    - type: RequestHeaderModifier
      requestHeaderModifier:
        set:
        - name: "set-header"
          value: "foo"
EOF
Querying headers.example/get should result in a 200 response from the example Gateway and the output from the
example app should indicate that the upstream example app received the header add-header with the original value
something replaced by foo.
$ curl -vvv --header "Host: headers.example" "http://${GATEWAY_HOST}/get" --header "set-header: something"
...
> GET /get HTTP/1.1
> Host: headers.example
> User-Agent: curl/7.81.0
> Accept: */*
> add-header: something
>
* Mark bundle as not supporting multiuse
< HTTP/1.1 200 OK
< content-type: application/json
< x-content-type-options: nosniff
< content-length: 474
< x-envoy-upstream-service-time: 0
< server: envoy
<
 "headers": {
  "Accept": [
   "*/*"
  ],
  "Set-Header": [
   "foo"
  ],
...
Headers can be removed from a request by simply supplying a list of header names.
Setting headers is similar to adding headers. If the request does not have the header configured by the filter, then it
will be added, but unlike adding request headers which will append the value of the header if
the request already contains it, setting a header will cause the value to be replaced by the value configured in the
filter.
cat <<EOF | kubectl apply -f -
apiVersion: gateway.networking.k8s.io/v1beta1
kind: HTTPRoute
metadata:
  name: http-headers
spec:
  parentRefs:
  - name: eg
  hostnames:
  - headers.example
  rules:
  - matches:
    - path:
        type: PathPrefix
        value: /
    backendRefs:
    - group: ""
      name: backend
      port: 3000
      weight: 1
    filters:
    - type: RequestHeaderModifier
      requestHeaderModifier:
        remove:
        - "remove-header"
EOF
Querying headers.example/get should result in a 200 response from the example Gateway and the output from the
example app should indicate that the upstream example app received the header add-header, but the header
remove-header that was sent by curl was removed before the upstream received the request.
$ curl -vvv --header "Host: headers.example" "http://${GATEWAY_HOST}/get" --header "add-header: something" --header "remove-header: foo"
...
> GET /get HTTP/1.1
> Host: headers.example
> User-Agent: curl/7.81.0
> Accept: */*
> add-header: something
>
* Mark bundle as not supporting multiuse
< HTTP/1.1 200 OK
< content-type: application/json
< x-content-type-options: nosniff
< content-length: 474
< x-envoy-upstream-service-time: 0
< server: envoy
<

 "headers": {
  "Accept": [
   "*/*"
  ],
  "Add-Header": [
   "something"
  ],
...
Combining Filters
Headers can be added/set/removed in a single filter on the same HTTPRoute and they will all perform as expected
cat <<EOF | kubectl apply -f -
apiVersion: gateway.networking.k8s.io/v1beta1
kind: HTTPRoute
metadata:
  name: http-headers
spec:
  parentRefs:
  - name: eg
  hostnames:
  - headers.example
  rules:
  - matches:
    - path:
        type: PathPrefix
        value: /
    backendRefs:
    - group: ""
      kind: Service
      name: backend
      port: 3000
      weight: 1
    filters:
    - type: RequestHeaderModifier
      requestHeaderModifier:
        add:
        - name: "add-header-1"
          value: "foo"
        set:
        - name: "set-header-1"
          value: "bar"
        remove:
        - "removed-header"
EOF
2.5 - HTTP Response Headers
The HTTPRoute resource can modify the headers of a response before responding it to the downstream service. To learn
more about HTTP routing, refer to the Gateway API documentation.
A ResponseHeaderModifier filter instructs Gateways to modify the headers in responses that match the
rule before responding to the downstream. Note that the ResponseHeaderModifier filter will only modify headers before
the response is returned from Envoy to the downstream client and will not affect request headers forwarding to the
upstream service.
Prerequisites
Follow the steps from the Quickstart Guide to install Envoy Gateway and the example manifest.
Before proceeding, you should be able to query the example backend using HTTP.
The ResponseHeaderModifier filter can add new headers to a response before it is sent to the upstream. If the response
does not have the header configured by the filter, then that header will be added to the response. If the response
already has the header configured by the filter, then the value of the header in the filter will be appended to the
value of the header in the response.
cat <<EOF | kubectl apply -f -
apiVersion: gateway.networking.k8s.io/v1beta1
kind: HTTPRoute
metadata:
  name: http-headers
spec:
  parentRefs:
  - name: eg
  hostnames:
  - headers.example
  rules:
  - matches:
    - path:
        type: PathPrefix
        value: /
    backendRefs:
    - group: ""
      kind: Service
      name: backend
      port: 3000
      weight: 1
    filters:
    - type: ResponseHeaderModifier
      responseHeaderModifier:
        add:
        - name: "add-header"
          value: "foo"
EOF
The HTTPRoute status should indicate that it has been accepted and is bound to the example Gateway.
kubectl get httproute/http-headers -o yaml
Get the Gateway’s address:
export GATEWAY_HOST=$(kubectl get gateway/eg -o jsonpath='{.status.addresses[0].value}')
Querying headers.example/get should result in a 200 response from the example Gateway and the output from the
example app should indicate that the downstream client received the header add-header with the value: foo
$ curl -vvv --header "Host: headers.example" "http://${GATEWAY_HOST}/get" -H 'X-Echo-Set-Header: X-Foo: value1'
...
> GET /get HTTP/1.1
> Host: headers.example
> User-Agent: curl/7.81.0
> Accept: */*
> X-Echo-Set-Header: X-Foo: value1
>
* Mark bundle as not supporting multiuse
< HTTP/1.1 200 OK
< content-type: application/json
< x-content-type-options: nosniff
< content-length: 474
< x-envoy-upstream-service-time: 0
< server: envoy
< x-foo: value1
< add-header: foo
<
...
 "headers": {
  "Accept": [
   "*/*"
  ],
  "X-Echo-Set-Header": [
   "X-Foo: value1"
  ]
...
Setting headers is similar to adding headers. If the response does not have the header configured by the filter, then it
will be added, but unlike adding response headers which will append the value of the header
if the response already contains it, setting a header will cause the value to be replaced by the value configured in the
filter.
cat <<EOF | kubectl apply -f -
apiVersion: gateway.networking.k8s.io/v1beta1
kind: HTTPRoute
metadata:
  name: http-headers
spec:
  parentRefs:
  - name: eg
  hostnames:
  - headers.example
  rules:
  - backendRefs:
    - group: ""
      kind: Service
      name: backend
      port: 3000
      weight: 1
    matches:
    - path:
        type: PathPrefix
        value: /
    filters:
    - type: ResponseHeaderModifier
      responseHeaderModifier:
        set:
        - name: "set-header"
          value: "foo"
EOF
Querying headers.example/get should result in a 200 response from the example Gateway and the output from the
example app should indicate that the downstream client received the header set-header with the original value value1
replaced by foo.
$ curl -vvv --header "Host: headers.example" "http://${GATEWAY_HOST}/get" -H 'X-Echo-Set-Header: set-header: value1'
...
> GET /get HTTP/1.1
> Host: headers.example
> User-Agent: curl/7.81.0
> Accept: */*
> X-Echo-Set-Header: set-header: value1
>
* Mark bundle as not supporting multiuse
< HTTP/1.1 200 OK
< content-type: application/json
< x-content-type-options: nosniff
< content-length: 474
< x-envoy-upstream-service-time: 0
< server: envoy
< set-header: foo
<
 "headers": {
  "Accept": [
   "*/*"
  ],
  "X-Echo-Set-Header": [
    "set-header": value1"
  ]
...
Headers can be removed from a response by simply supplying a list of header names.
Setting headers is similar to adding headers. If the response does not have the header configured by the filter, then it
will be added, but unlike adding response headers which will append the value of the header
if the response already contains it, setting a header will cause the value to be replaced by the value configured in the
filter.
cat <<EOF | kubectl apply -f -
apiVersion: gateway.networking.k8s.io/v1beta1
kind: HTTPRoute
metadata:
  name: http-headers
spec:
  parentRefs:
  - name: eg
  hostnames:
  - headers.example
  rules:
  - matches:
    - path:
        type: PathPrefix
        value: /
    backendRefs:
    - group: ""
      name: backend
      port: 3000
      weight: 1
    filters:
    - type: ResponseHeaderModifier
      responseHeaderModifier:
        remove:
        - "remove-header"
EOF
Querying headers.example/get should result in a 200 response from the example Gateway and the output from the
example app should indicate that the header remove-header that was sent by curl was removed before the upstream
received the response.
$ curl -vvv --header "Host: headers.example" "http://${GATEWAY_HOST}/get" -H 'X-Echo-Set-Header: remove-header: value1'
...
> GET /get HTTP/1.1
> Host: headers.example
> User-Agent: curl/7.81.0
> Accept: */*
> X-Echo-Set-Header: remove-header: value1
>
* Mark bundle as not supporting multiuse
< HTTP/1.1 200 OK
< content-type: application/json
< x-content-type-options: nosniff
< content-length: 474
< x-envoy-upstream-service-time: 0
< server: envoy
<

 "headers": {
  "Accept": [
   "*/*"
  ],
  "X-Echo-Set-Header": [
    "remove-header": value1"
  ]
...
Combining Filters
Headers can be added/set/removed in a single filter on the same HTTPRoute and they will all perform as expected
cat <<EOF | kubectl apply -f -
apiVersion: gateway.networking.k8s.io/v1beta1
kind: HTTPRoute
metadata:
  name: http-headers
spec:
  parentRefs:
  - name: eg
  hostnames:
  - headers.example
  rules:
  - matches:
    - path:
        type: PathPrefix
        value: /
    backendRefs:
    - group: ""
      kind: Service
      name: backend
      port: 3000
      weight: 1
    filters:
    - type: ResponseHeaderModifier
      responseHeaderModifier:
        add:
        - name: "add-header-1"
          value: "foo"
        set:
        - name: "set-header-1"
          value: "bar"
        remove:
        - "removed-header"
EOF
2.6 - HTTP Routing
The HTTPRoute resource allows users to configure HTTP routing by matching HTTP traffic and forwarding it to
Kubernetes backends. Currently, the only supported backend supported by Envoy Gateway is a Service resource. This guide
shows how to route traffic based on host, header, and path fields and forward the traffic to different Kubernetes
Services. To learn more about HTTP routing, refer to the Gateway API documentation.
Prerequisites
Install Envoy Gateway:
kubectl apply -f https://github.com/envoyproxy/gateway/releases/download/v0.3.0/install.yaml
Wait for Envoy Gateway to become available:
kubectl wait --timeout=5m -n envoy-gateway-system deployment/envoy-gateway --for=condition=Available
Installation
Install the HTTP routing example resources:
kubectl apply -f https://raw.githubusercontent.com/envoyproxy/gateway/v0.3.0/examples/kubernetes/http-routing.yaml
The manifest installs a GatewayClass, Gateway, four Deployments, four Services, and three HTTPRoute resources.
The GatewayClass is a cluster-scoped resource that represents a class of Gateways that can be instantiated.
Note: Envoy Gateway is configured by default to manage a GatewayClass with
controllerName: gateway.envoyproxy.io/gatewayclass-controller.
Verification
Check the status of the GatewayClass:
kubectl get gc --selector=example=http-routing
The status should reflect “Accepted=True”, indicating Envoy Gateway is managing the GatewayClass.
A Gateway represents configuration of infrastructure. When a Gateway is created, Envoy proxy infrastructure is
provisioned or configured by Envoy Gateway. The gatewayClassName defines the name of a GatewayClass used by this
Gateway. Check the status of the Gateway:
kubectl get gateways --selector=example=http-routing
The status should reflect “Ready=True”, indicating the Envoy proxy infrastructure has been provisioned. The status also
provides the address of the Gateway. This address is used later in the guide to test connectivity to proxied backend
services.
The three HTTPRoute resources create routing rules on the Gateway. In order to receive traffic from a Gateway,
an HTTPRoute must be configured with parentRefs which reference the parent Gateway(s) that it should be attached to.
An HTTPRoute can match against a single set of hostnames. These hostnames are matched before any other matching
within the HTTPRoute takes place. Since example.com, foo.example.com, and bar.example.com are separate hosts with
different routing requirements, each is deployed as its own HTTPRoute - example-route, ``foo-route, and bar-route.
Check the status of the HTTPRoutes:
kubectl get httproutes --selector=example=http-routing -o yaml
The status for each HTTPRoute should surface “Accepted=True” and a parentRef that references the example Gateway.
The example-route matches any traffic for “example.com” and forwards it to the “example-svc” Service.
Testing the Configuration
Before testing HTTP routing to the example-svc backend, get the Gateway’s address.
export GATEWAY_HOST=$(kubectl get gateway/example-gateway -o jsonpath='{.status.addresses[0].value}')
Test HTTP routing to the example-svc backend.
curl -vvv --header "Host: example.com" "http://${GATEWAY_HOST}/"
A 200 status code should be returned and the body should include "pod": "example-backend-*" indicating the traffic
was routed to the example backend service. If you change the hostname to a hostname not represented in any of the
HTTPRoutes, e.g. “www.example.com”, the HTTP traffic will not be routed and a 404 should be returned.
The foo-route matches any traffic for foo.example.com and applies its routing rules to forward the traffic to the
“foo-svc” Service. Since there is only one path prefix match for /login, only foo.example.com/login/* traffic will
be forwarded. Test HTTP routing to the foo-svc backend.
curl -vvv --header "Host: foo.example.com" "http://${GATEWAY_HOST}/login"
A 200 status code should be returned and the body should include "pod": "foo-backend-*" indicating the traffic
was routed to the foo backend service. Traffic to any other paths that do not begin with /login will not be matched by
this HTTPRoute. Test this by removing /login from the request.
curl -vvv --header "Host: foo.example.com" "http://${GATEWAY_HOST}/"
The HTTP traffic will not be routed and a 404 should be returned.
Similarly, the bar-route HTTPRoute matches traffic for bar.example.com. All traffic for this hostname will be
evaluated against the routing rules. The most specific match will take precedence which means that any traffic with the
env:canary header will be forwarded to bar-svc-canary and if the header is missing or not canary then it’ll be
forwarded to bar-svc. Test HTTP routing to the bar-svc backend.
curl -vvv --header "Host: bar.example.com" "http://${GATEWAY_HOST}/"
A 200 status code should be returned and the body should include "pod": "bar-backend-*" indicating the traffic
was routed to the foo backend service.
Test HTTP routing to the bar-canary-svc backend by adding the env: canary header to the request.
curl -vvv --header "Host: bar.example.com" --header "env: canary" "http://${GATEWAY_HOST}/"
A 200 status code should be returned and the body should include "pod": "bar-canary-backend-*" indicating the
traffic was routed to the foo backend service.
2.7 - HTTP URL Rewrite
HTTPURLRewriteFilter defines a filter that modifies a request during forwarding. At most one of these filters may be
used on a Route rule. This MUST NOT be used on the same Route rule as a HTTPRequestRedirect filter.
Prerequisites
Follow the steps from the Quickstart Guide to install Envoy Gateway and the example manifest.
Before proceeding, you should be able to query the example backend using HTTP.
Rewrite URL Prefix Path
You can configure to rewrite the prefix in the url like below. In this example, any curls to
http://${GATEWAY_HOST}/get/xxx will be rewritten to http://${GATEWAY_HOST}/replace/xxx.
cat <<EOF | kubectl apply -f -
apiVersion: gateway.networking.k8s.io/v1beta1
kind: HTTPRoute
metadata:
  name: http-filter-url-rewrite
spec:
  parentRefs:
    - name: eg
  hostnames:
    - path.rewrite.example
  rules:
    - matches:
      - path:
          value: "/get"
      filters:
      - type: URLRewrite
        urlRewrite:
          path:
            type: ReplacePrefixMatch
            replacePrefixMatch: /replace
      backendRefs:
      - name: backend
        port: 3000
EOF
The HTTPRoute status should indicate that it has been accepted and is bound to the example Gateway.
kubectl get httproute/http-filter-url-rewrite -o yaml
Get the Gateway’s address:
export GATEWAY_HOST=$(kubectl get gateway/eg -o jsonpath='{.status.addresses[0].value}')
Querying http://${GATEWAY_HOST}/get/origin/path should rewrite to
http://${GATEWAY_HOST}/replace/origin/path.
$ curl -L -vvv --header "Host: path.rewrite.example" "http://${GATEWAY_HOST}/get/origin/path"
...
> GET /get/origin/path HTTP/1.1
> Host: path.rewrite.example
> User-Agent: curl/7.85.0
> Accept: */*
>

< HTTP/1.1 200 OK
< content-type: application/json
< x-content-type-options: nosniff
< date: Wed, 21 Dec 2022 11:03:28 GMT
< content-length: 503
< x-envoy-upstream-service-time: 0
< server: envoy
<
{
 "path": "/replace/origin/path",
 "host": "path.rewrite.example",
 "method": "GET",
 "proto": "HTTP/1.1",
 "headers": {
  "Accept": [
   "*/*"
  ],
  "User-Agent": [
   "curl/7.85.0"
  ],
  "X-Envoy-Expected-Rq-Timeout-Ms": [
   "15000"
  ],
  "X-Envoy-Original-Path": [
   "/get/origin/path"
  ],
  "X-Forwarded-Proto": [
   "http"
  ],
  "X-Request-Id": [
   "fd84b842-9937-4fb5-83c7-61470d854b90"
  ]
 },
 "namespace": "default",
 "ingress": "",
 "service": "",
 "pod": "backend-6fdd4b9bd8-8vlc5"
...
You can see that the X-Envoy-Original-Path is /get/origin/path, but the actual path is /replace/origin/path.
Rewrite URL Full Path
You can configure to rewrite the fullpath in the url like below. In this example, any request sent to
http://${GATEWAY_HOST}/get/origin/path/xxxx will be rewritten to
http://${GATEWAY_HOST}/force/replace/fullpath.
cat <<EOF | kubectl apply -f -
apiVersion: gateway.networking.k8s.io/v1beta1
kind: HTTPRoute
metadata:
  name: http-filter-url-rewrite
spec:
  parentRefs:
    - name: eg
  hostnames:
    - path.rewrite.example
  rules:
    - matches:
      - path:
          type: PathPrefix
          value: "/get/origin/path"
      filters:
      - type: URLRewrite
        urlRewrite:
          path:
            type: ReplaceFullPath
            replaceFullPath: /force/replace/fullpath
      backendRefs:
      - name: backend
        port: 3000
EOF
The HTTPRoute status should indicate that it has been accepted and is bound to the example Gateway.
kubectl get httproute/http-filter-url-rewrite -o yaml
Querying http://${GATEWAY_HOST}/get/origin/path/extra should rewrite the request to
http://${GATEWAY_HOST}/force/replace/fullpath.
$ curl -L -vvv --header "Host: path.rewrite.example" "http://${GATEWAY_HOST}/get/origin/path/extra"
...
> GET /get/origin/path/extra HTTP/1.1
> Host: path.rewrite.example
> User-Agent: curl/7.85.0
> Accept: */*
>
* Mark bundle as not supporting multiuse
< HTTP/1.1 200 OK
< content-type: application/json
< x-content-type-options: nosniff
< date: Wed, 21 Dec 2022 11:09:31 GMT
< content-length: 512
< x-envoy-upstream-service-time: 0
< server: envoy
<
{
 "path": "/force/replace/fullpath",
 "host": "path.rewrite.example",
 "method": "GET",
 "proto": "HTTP/1.1",
 "headers": {
  "Accept": [
   "*/*"
  ],
  "User-Agent": [
   "curl/7.85.0"
  ],
  "X-Envoy-Expected-Rq-Timeout-Ms": [
   "15000"
  ],
  "X-Envoy-Original-Path": [
   "/get/origin/path/extra"
  ],
  "X-Forwarded-Proto": [
   "http"
  ],
  "X-Request-Id": [
   "8ab774d6-9ffa-4faa-abbb-f45b0db00895"
  ]
 },
 "namespace": "default",
 "ingress": "",
 "service": "",
 "pod": "backend-6fdd4b9bd8-8vlc5"
...
You can see that the X-Envoy-Original-Path is /get/origin/path/extra, but the actual path is
/force/replace/fullpath.
Rewrite Host Name
You can configure to rewrite the hostname like below. In this example, any requests sent to
http://${GATEWAY_HOST}/get with --header "Host: path.rewrite.example" will rewrite host into envoygateway.io.
cat <<EOF | kubectl apply -f -
apiVersion: gateway.networking.k8s.io/v1beta1
kind: HTTPRoute
metadata:
  name: http-filter-url-rewrite
spec:
  parentRefs:
    - name: eg
  hostnames:
    - path.rewrite.example
  rules:
    - matches:
      - path:
          type: PathPrefix
          value: "/get"
      filters:
      - type: URLRewrite
        urlRewrite:
          hostname: "envoygateway.io"
      backendRefs:
      - name: backend
        port: 3000
EOF
The HTTPRoute status should indicate that it has been accepted and is bound to the example Gateway.
kubectl get httproute/http-filter-url-rewrite -o yaml
Querying http://${GATEWAY_HOST}/get with --header "Host: path.rewrite.example" will rewrite host into
envoygateway.io.
$ curl -L -vvv --header "Host: path.rewrite.example" "http://${GATEWAY_HOST}/get"
...
> GET /get HTTP/1.1
> Host: path.rewrite.example
> User-Agent: curl/7.85.0
> Accept: */*
>
* Mark bundle as not supporting multiuse
< HTTP/1.1 200 OK
< content-type: application/json
< x-content-type-options: nosniff
< date: Wed, 21 Dec 2022 11:15:15 GMT
< content-length: 481
< x-envoy-upstream-service-time: 0
< server: envoy
<
{
 "path": "/get",
 "host": "envoygateway.io",
 "method": "GET",
 "proto": "HTTP/1.1",
 "headers": {
  "Accept": [
   "*/*"
  ],
  "User-Agent": [
   "curl/7.85.0"
  ],
  "X-Envoy-Expected-Rq-Timeout-Ms": [
   "15000"
  ],
  "X-Forwarded-Host": [
   "path.rewrite.example"
  ],
  "X-Forwarded-Proto": [
   "http"
  ],
  "X-Request-Id": [
   "39aa447c-97b9-45a3-a675-9fb266ab1af0"
  ]
 },
 "namespace": "default",
 "ingress": "",
 "service": "",
 "pod": "backend-6fdd4b9bd8-8vlc5"
...
You can see that the X-Forwarded-Host is path.rewrite.example, but the actual host is envoygateway.io.
2.8 - HTTPRoute Traffic Splitting
The HTTPRoute resource allows one or more backendRefs to be provided. Requests will be routed to these upstreams
if they match the rules of the HTTPRoute. If an invalid backendRef is configured, then HTTP responses will be returned
with status code 500 for all requests that would have been sent to that backend.
Installation
Follow the steps from the Quickstart Guide to install Envoy Gateway and the example manifest.
Before proceeding, you should be able to query the example backend using HTTP.
Single backendRef
When a single backendRef is configured in a HTTPRoute, it will receive 100% of the traffic.
cat <<EOF | kubectl apply -f -
apiVersion: gateway.networking.k8s.io/v1beta1
kind: HTTPRoute
metadata:
  name: http-headers
spec:
  parentRefs:
  - name: eg
  hostnames:
  - backends.example
  rules:
  - matches:
    - path:
        type: PathPrefix
        value: /
    backendRefs:
    - group: ""
      kind: Service
      name: backend
      port: 3000
EOF
The HTTPRoute status should indicate that it has been accepted and is bound to the example Gateway.
kubectl get httproute/http-headers -o yaml
Get the Gateway’s address:
export GATEWAY_HOST=$(kubectl get gateway/eg -o jsonpath='{.status.addresses[0].value}')
Querying backends.example/get should result in a 200 response from the example Gateway and the output from the
example app should indicate which pod handled the request. There is only one pod in the deployment for the example app
from the quickstart, so it will be the same on all subsequent requests.
$ curl -vvv --header "Host: backends.example" "http://${GATEWAY_HOST}/get"
...
> GET /get HTTP/1.1
> Host: backends.example
> User-Agent: curl/7.81.0
> Accept: */*
> add-header: something
>
* Mark bundle as not supporting multiuse
< HTTP/1.1 200 OK
< content-type: application/json
< x-content-type-options: nosniff
< content-length: 474
< x-envoy-upstream-service-time: 0
< server: envoy
<
...
 "namespace": "default",
 "ingress": "",
 "service": "",
 "pod": "backend-79665566f5-s589f"
...
Multiple backendRefs
If multiple backendRefs are configured, then traffic will be split between the backendRefs equally unless a weight is
configured.
First, create a second instance of the example app from the quickstart:
cat <<EOF | kubectl apply -f -
---
apiVersion: v1
kind: ServiceAccount
metadata:
  name: backend-2
---
apiVersion: v1
kind: Service
metadata:
  name: backend-2
  labels:
    app: backend-2
    service: backend-2
spec:
  ports:
    - name: http
      port: 3000
      targetPort: 3000
  selector:
    app: backend-2
---
apiVersion: apps/v1
kind: Deployment
metadata:
  name: backend-2
spec:
  replicas: 1
  selector:
    matchLabels:
      app: backend-2
      version: v1
  template:
    metadata:
      labels:
        app: backend-2
        version: v1
    spec:
      serviceAccountName: backend-2
      containers:
        - image: gcr.io/k8s-staging-ingressconformance/echoserver:v20221109-7ee2f3e
          imagePullPolicy: IfNotPresent
          name: backend-2
          ports:
            - containerPort: 3000
          env:
            - name: POD_NAME
              valueFrom:
                fieldRef:
                  fieldPath: metadata.name
            - name: NAMESPACE
              valueFrom:
                fieldRef:
                  fieldPath: metadata.namespace
EOF
Then create an HTTPRoute that uses both the app from the quickstart and the second instance that was just created
cat <<EOF | kubectl apply -f -
apiVersion: gateway.networking.k8s.io/v1beta1
kind: HTTPRoute
metadata:
  name: http-headers
spec:
  parentRefs:
  - name: eg
  hostnames:
  - backends.example
  rules:
  - matches:
    - path:
        type: PathPrefix
        value: /
    backendRefs:
    - group: ""
      kind: Service
      name: backend
      port: 3000
    - group: ""
      kind: Service
      name: backend-2
      port: 3000
EOF
Querying backends.example/get should result in 200 responses from the example Gateway and the output from the
example app that indicates which pod handled the request should switch between the first pod and the second one from the
new deployment on subsequent requests.
$ curl -vvv --header "Host: backends.example" "http://${GATEWAY_HOST}/get"
...
> GET /get HTTP/1.1
> Host: backends.example
> User-Agent: curl/7.81.0
> Accept: */*
> add-header: something
>
* Mark bundle as not supporting multiuse
< HTTP/1.1 200 OK
< content-type: application/json
< x-content-type-options: nosniff
< content-length: 474
< x-envoy-upstream-service-time: 0
< server: envoy
<
...
 "namespace": "default",
 "ingress": "",
 "service": "",
 "pod": "backend-75bcd4c969-lsxpz"
...
Weighted backendRefs
If multiple backendRefs are configured and an un-even traffic split between the backends is desired, then the weight
field can be used to control the weight of requests to each backend. If weight is not configured for a backendRef it is
assumed to be 1.
The weight field in a backendRef controls the distribution of the traffic split. The proportion of
requests to a single backendRef is calculated by dividing its weight by the sum of all backendRef weights in the
HTTPRoute. The weight is not a percentage and the sum of all weights does not need to add up to 100.
The HTTPRoute below will configure the gateway to send 80% of the traffic to the backend service, and 20% to the
backend-2 service.
cat <<EOF | kubectl apply -f -
apiVersion: gateway.networking.k8s.io/v1beta1
kind: HTTPRoute
metadata:
  name: http-headers
spec:
  parentRefs:
  - name: eg
  hostnames:
  - backends.example
  rules:
  - matches:
    - path:
        type: PathPrefix
        value: /
    backendRefs:
    - group: ""
      kind: Service
      name: backend
      port: 3000
      weight: 8
    - group: ""
      kind: Service
      name: backend-2
      port: 3000
      weight: 2
EOF
Invalid backendRefs
backendRefs can be considered invalid for the following reasons:
- The
group field is configured to something other than "". Currently, only the core API group (specified by
omitting the group field or setting it to an empty string) is supported - The
kind field is configured to anything other than Service. Envoy Gateway currently only supports Kubernetes
Service backendRefs - The backendRef configures a service with a
namespace not permitted by any existing ReferenceGrants - The
port field is not configured or is configured to a port that does not exist on the Service - The named Service configured by the backendRef cannot be found
Modifying the above example to make the backend-2 backendRef invalid by using a port that does not exist on the Service
will result in 80% of the traffic being sent to the backend service, and 20% of the traffic receiving an HTTP response
with status code 500.
cat <<EOF | kubectl apply -f -
apiVersion: gateway.networking.k8s.io/v1beta1
kind: HTTPRoute
metadata:
  name: http-headers
spec:
  parentRefs:
  - name: eg
  hostnames:
  - backends.example
  rules:
  - matches:
    - path:
        type: PathPrefix
        value: /
    backendRefs:
    - group: ""
      kind: Service
      name: backend
      port: 3000
      weight: 8
    - group: ""
      kind: Service
      name: backend-2
      port: 9000
      weight: 2
EOF
Querying backends.example/get should result in 200 responses 80% of the time, and 500 responses 20% of the time.
$ curl -vvv --header "Host: backends.example" "http://${GATEWAY_HOST}/get"
> GET /get HTTP/1.1
> Host: backends.example
> User-Agent: curl/7.81.0
> Accept: */*
>
* Mark bundle as not supporting multiuse
< HTTP/1.1 500 Internal Server Error
< server: envoy
< content-length: 0
<
2.9 - Rate limit
Rate limit is a feature that allows the user to limit the number of incoming requests to a predefined value based on attributes within the traffic flow.
Here are some reasons why you may want to implements Rate limits
- To prevent malicious activity such as DDoS attacks.
- To prevent applications and its resources (such as a database) from getting overloaded.
- To create API limits based on user entitlements.
Envoy Gateway supports Global rate limiting, where the rate limit is common across all the instances of Envoy proxies where its applied
i.e. if the data plane has 2 replicas of Envoy running, and the rate limit is 10 requests/second, this limit is common and will be hit
if 5 requests pass through the first replica and 5 requests pass through the second replica within the same second.
Envoy Gateway introduces a new CRD called RateLimitFilter that allows the user to describe their rate limit intent. This instantiated resource
can be linked to a HTTPRoute resource using an ExtensionRef filter.
Prerequisites
Install Envoy Gateway
- Follow the steps from the Quickstart Guide to install Envoy Gateway and the example manifest.
Before proceeding, you should be able to query the example backend using HTTP.
Install Redis
- The global rate limit feature is based on Envoy Ratelimit which requires a Redis instance as its caching layer.
Lets install a Redis deployment in the
redis-system namespce.
cat <<EOF | kubectl apply -f -
kind: Namespace
apiVersion: v1
metadata:
  name: redis-system
---
apiVersion: apps/v1
kind: Deployment
metadata:
  name: redis
  namespace: redis-system
  labels:
    app: redis
spec:
  replicas: 1
  selector:
    matchLabels:
      app: redis
  template:
    metadata:
      labels:
        app: redis
    spec:
      containers:
      - image: redis:6.0.6
        imagePullPolicy: IfNotPresent
        name: redis
        resources:
          limits:
            cpu: 1500m
            memory: 512Mi
          requests:
            cpu: 200m
            memory: 256Mi
---
apiVersion: v1
kind: Service
metadata:
  name: redis
  namespace: redis-system
  labels:
    app: redis
  annotations:
spec:
  ports:
  - name: redis
    port: 6379
    protocol: TCP
    targetPort: 6379
  selector:
    app: redis
---

EOF
Enable Global Rate limit in Envoy Gateway
- The default installation of Envoy Gateway installs a default EnvoyGateway configuration and attaches it
using a
ConfigMap. In the next step, we will update this resource to enable rate limit in Envoy Gateway
as well as configure the URL for the Redis instance used for Global rate limiting.
cat <<EOF | kubectl apply -f -
apiVersion: v1
kind: ConfigMap
metadata:
  name: envoy-gateway-config
  namespace: envoy-gateway-system
data:
  envoy-gateway.yaml: |
    apiVersion: config.gateway.envoyproxy.io/v1alpha1
    kind: EnvoyGateway
    provider:
      type: Kubernetes
    gateway:
      controllerName: gateway.envoyproxy.io/gatewayclass-controller
    rateLimit:
      backend:
        type: Redis
        redis:
          url: redis.redis-system.svc.cluster.local:6379
EOF
- After updating the
ConfigMap, you will need to restart the envoy-gateway deployment so the configuration kicks in
kubectl rollout restart deployment envoy-gateway -n envoy-gateway-system
Rate limit specific user
Here is an example of a rate limit implemented by the application developer to limit a specific user by matching on a custom x-user-id header
with a value set to one.
cat <<EOF | kubectl apply -f -
apiVersion: gateway.envoyproxy.io/v1alpha1
kind: RateLimitFilter
metadata:
  name: ratelimit-specific-user
spec:
  type: Global
  global:
    rules:
    - clientSelectors:
      - headers:
        - name: x-user-id
          value: one
      limit:
        requests: 3
        unit: Hour
---
apiVersion: gateway.networking.k8s.io/v1beta1
kind: HTTPRoute
metadata:
  name: http-ratelimit
spec:
  parentRefs:
  - name: eg
  hostnames:
  - ratelimit.example
  rules:
  - matches:
    - path:
        type: PathPrefix
        value: /
    filters:
    - type: ExtensionRef
      extensionRef:
        group: gateway.envoyproxy.io
        kind: RateLimitFilter
        name: ratelimit-specific-user
    backendRefs:
    - group: ""
      kind: Service
      name: backend
      port: 3000
EOF
The HTTPRoute status should indicate that it has been accepted and is bound to the example Gateway.
kubectl get httproute/http-ratelimit -o yaml
Get the Gateway’s address:
export GATEWAY_HOST=$(kubectl get gateway/eg -o jsonpath='{.status.addresses[0].value}')
Lets query ratelimit.example/get 4 times. We should receive a 200 response from the example Gateway for the first 3 requests
and then receive a 429 status code for the 4th request since the limit is set at 3 requests/Hour for the request which contains the header x-user-id
and value one.
for i in {1..4}; do curl -I --header "Host: ratelimit.example" --header "x-user-id: one" http://${GATEWAY_HOST}/get ; sleep 1; done
HTTP/1.1 200 OK
content-type: application/json
x-content-type-options: nosniff
date: Wed, 08 Feb 2023 02:33:31 GMT
content-length: 460
x-envoy-upstream-service-time: 4
server: envoy

HTTP/1.1 200 OK
content-type: application/json
x-content-type-options: nosniff
date: Wed, 08 Feb 2023 02:33:32 GMT
content-length: 460
x-envoy-upstream-service-time: 2
server: envoy

HTTP/1.1 200 OK
content-type: application/json
x-content-type-options: nosniff
date: Wed, 08 Feb 2023 02:33:33 GMT
content-length: 460
x-envoy-upstream-service-time: 0
server: envoy

HTTP/1.1 429 Too Many Requests
x-envoy-ratelimited: true
date: Wed, 08 Feb 2023 02:33:34 GMT
server: envoy
transfer-encoding: chunked
You should be able to send requests with the x-user-id header and a different value and receive successful responses from the server.
for i in {1..4}; do curl -I --header "Host: ratelimit.example" --header "x-user-id: two" http://${GATEWAY_HOST}/get ; sleep 1; done
HTTP/1.1 200 OK
content-type: application/json
x-content-type-options: nosniff
date: Wed, 08 Feb 2023 02:34:36 GMT
content-length: 460
x-envoy-upstream-service-time: 0
server: envoy

HTTP/1.1 200 OK
content-type: application/json
x-content-type-options: nosniff
date: Wed, 08 Feb 2023 02:34:37 GMT
content-length: 460
x-envoy-upstream-service-time: 0
server: envoy

HTTP/1.1 200 OK
content-type: application/json
x-content-type-options: nosniff
date: Wed, 08 Feb 2023 02:34:38 GMT
content-length: 460
x-envoy-upstream-service-time: 0
server: envoy

HTTP/1.1 200 OK
content-type: application/json
x-content-type-options: nosniff
date: Wed, 08 Feb 2023 02:34:39 GMT
content-length: 460
x-envoy-upstream-service-time: 0
server: envoy
Rate limit distinct users
Here is an example of a rate limit implemented by the application developer to limit distinct users who can be differentiated based on the
value in the x-user-id header. Here, user one (recognised from the traffic flow using the header x-user-id and value one) will be rate limited at 3 requests/hour
and so will user two (recognised from the traffic flow using the header x-user-id and value two).
cat <<EOF | kubectl apply -f -
apiVersion: gateway.envoyproxy.io/v1alpha1
kind: RateLimitFilter
metadata:
  name: ratelimit-distinct-users
spec:
  type: Global
  global:
    rules:
    - clientSelectors:
      - headers:
        - type: Distinct
          name: x-user-id
      limit:
        requests: 3
        unit: Hour
---
apiVersion: gateway.networking.k8s.io/v1beta1
kind: HTTPRoute
metadata:
  name: http-ratelimit
spec:
  parentRefs:
  - name: eg
  hostnames:
  - ratelimit.example
  rules:
  - matches:
    - path:
        type: PathPrefix
        value: /
    filters:
    - type: ExtensionRef
      extensionRef:
        group: gateway.envoyproxy.io
        kind: RateLimitFilter
        name: ratelimit-distinct-users
    backendRefs:
    - group: ""
      kind: Service
      name: backend
      port: 3000
EOF
Lets run the same command again with the header x-user-id and value one set in the request. We should the first 3 requests succeeding and
the 4th request being rate limited.
for i in {1..4}; do curl -I --header "Host: ratelimit.example" --header "x-user-id: one" http://${GATEWAY_HOST}/get ; sleep 1; done
HTTP/1.1 200 OK
content-type: application/json
x-content-type-options: nosniff
date: Wed, 08 Feb 2023 02:33:31 GMT
content-length: 460
x-envoy-upstream-service-time: 4
server: envoy

HTTP/1.1 200 OK
content-type: application/json
x-content-type-options: nosniff
date: Wed, 08 Feb 2023 02:33:32 GMT
content-length: 460
x-envoy-upstream-service-time: 2
server: envoy

HTTP/1.1 200 OK
content-type: application/json
x-content-type-options: nosniff
date: Wed, 08 Feb 2023 02:33:33 GMT
content-length: 460
x-envoy-upstream-service-time: 0
server: envoy

HTTP/1.1 429 Too Many Requests
x-envoy-ratelimited: true
date: Wed, 08 Feb 2023 02:33:34 GMT
server: envoy
transfer-encoding: chunked
You should see the same behavior when the value for header x-user-id is set to two and 4 requests are sent.
for i in {1..4}; do curl -I --header "Host: ratelimit.example" --header "x-user-id: two" http://${GATEWAY_HOST}/get ; sleep 1; done
HTTP/1.1 200 OK
content-type: application/json
x-content-type-options: nosniff
date: Wed, 08 Feb 2023 02:33:31 GMT
content-length: 460
x-envoy-upstream-service-time: 4
server: envoy

HTTP/1.1 200 OK
content-type: application/json
x-content-type-options: nosniff
date: Wed, 08 Feb 2023 02:33:32 GMT
content-length: 460
x-envoy-upstream-service-time: 2
server: envoy

HTTP/1.1 200 OK
content-type: application/json
x-content-type-options: nosniff
date: Wed, 08 Feb 2023 02:33:33 GMT
content-length: 460
x-envoy-upstream-service-time: 0
server: envoy

HTTP/1.1 429 Too Many Requests
x-envoy-ratelimited: true
date: Wed, 08 Feb 2023 02:33:34 GMT
server: envoy
transfer-encoding: chunked
Rate limit all requests
This example shows you how to rate limit all requests matching the HTTPRoute rule at 3 requests/Hour by leaving the clientSelectors field unset.
cat <<EOF | kubectl apply -f -
apiVersion: gateway.envoyproxy.io/v1alpha1
kind: RateLimitFilter
metadata:
  name: ratelimit-all-requests
spec:
  type: Global
  global:
    rules:
    - limit:
        requests: 3
        unit: Hour
---
apiVersion: gateway.networking.k8s.io/v1beta1
kind: HTTPRoute
metadata:
  name: http-ratelimit
spec:
  parentRefs:
  - name: eg
  hostnames:
  - ratelimit.example
  rules:
  - matches:
    - path:
        type: PathPrefix
        value: /
    filters:
    - type: ExtensionRef
      extensionRef:
        group: gateway.envoyproxy.io
        kind: RateLimitFilter
        name: ratelimit-all-requests
    backendRefs:
    - group: ""
      kind: Service
      name: backend
      port: 3000
EOF
for i in {1..4}; do curl -I --header "Host: ratelimit.example" http://${GATEWAY_HOST}/get ; sleep 1; done
HTTP/1.1 200 OK
content-type: application/json
x-content-type-options: nosniff
date: Wed, 08 Feb 2023 02:33:31 GMT
content-length: 460
x-envoy-upstream-service-time: 4
server: envoy

HTTP/1.1 200 OK
content-type: application/json
x-content-type-options: nosniff
date: Wed, 08 Feb 2023 02:33:32 GMT
content-length: 460
x-envoy-upstream-service-time: 2
server: envoy

HTTP/1.1 200 OK
content-type: application/json
x-content-type-options: nosniff
date: Wed, 08 Feb 2023 02:33:33 GMT
content-length: 460
x-envoy-upstream-service-time: 0
server: envoy

HTTP/1.1 429 Too Many Requests
x-envoy-ratelimited: true
date: Wed, 08 Feb 2023 02:33:34 GMT
server: envoy
transfer-encoding: chunked
2.10 - Request Authentication
This guide provides instructions for configuring JSON Web Token (JWT) authentication. JWT authentication checks
if an incoming request has a valid JWT before routing the request to a backend service. Currently, Envoy Gateway only
supports validating a JWT from an HTTP header, e.g. Authorization: Bearer <token>.
Installation
Follow the steps from the Quickstart guide to install Envoy Gateway and the example manifest.
Before proceeding, you should be able to query the example backend using HTTP.
Configuration
Allow requests with a valid JWT by creating an AuthenticationFilter and referencing it from the example HTTPRoute.
kubectl apply -f https://raw.githubusercontent.com/envoyproxy/gateway/v0.3.0/examples/kubernetes/authn/jwt.yaml
The HTTPRoute is now updated to authenticate requests for /foo and allow unauthenticated requests to /bar. The
/foo route rule references an AuthenticationFilter that provides the JWT authentication configuration.
Verify the HTTPRoute configuration and status:
kubectl get httproute/backend -o yaml
The AuthenticationFilter is configured for JWT authentication and uses a single JSON Web Key Set (JWKS)
provider for authenticating the JWT.
Verify the AuthenticationFilter configuration:
kubectl get authenticationfilter/jwt-example -o yaml
Testing
Ensure the GATEWAY_HOST environment variable from the Quickstart guide is set. If not, follow the
Quickstart instructions to set the variable.
Verify that requests to /foo are denied without a JWT:
curl -sS -o /dev/null -H "Host: www.example.com" -w "%{http_code}\n" http://$GATEWAY_HOST/foo
A 401 HTTP response code should be returned.
Get the JWT used for testing request authentication:
TOKEN=$(curl https://raw.githubusercontent.com/envoyproxy/gateway/main/examples/kubernetes/authn/test.jwt -s) && echo "$TOKEN" | cut -d '.' -f2 - | base64 --decode -
Note: The above command decodes and returns the token’s payload. You can replace f2 with f1 to view the token’s
header.
Verify that a request to /foo with a valid JWT is allowed:
curl -sS -o /dev/null -H "Host: www.example.com" -H "Authorization: Bearer $TOKEN" -w "%{http_code}\n" http://$GATEWAY_HOST/foo
A 200 HTTP response code should be returned.
Verify that requests to /bar are allowed without a JWT:
curl -sS -o /dev/null -H "Host: www.example.com" -w "%{http_code}\n" http://$GATEWAY_HOST/bar
Clean-Up
Follow the steps from the Quickstart guide to uninstall Envoy Gateway and the example manifest.
Delete the AuthenticationFilter:
kubectl delete authenticationfilter/jwt-example
Next Steps
Checkout the Developer Guide to get involved in the project.
2.11 - Secure Gateways
This guide will help you get started using secure Gateways. The guide uses a self-signed CA, so it should be used for
testing and demonstration purposes only.
Prerequisites
- OpenSSL to generate TLS assets.
Installation
Follow the steps from the Quickstart Guide to install Envoy Gateway and the example manifest.
Before proceeding, you should be able to query the example backend using HTTP.
TLS Certificates
Generate the certificates and keys used by the Gateway to terminate client TLS connections.
Create a root certificate and private key to sign certificates:
openssl req -x509 -sha256 -nodes -days 365 -newkey rsa:2048 -subj '/O=example Inc./CN=example.com' -keyout example.com.key -out example.com.crt
Create a certificate and a private key for www.example.com:
openssl req -out www.example.com.csr -newkey rsa:2048 -nodes -keyout www.example.com.key -subj "/CN=www.example.com/O=example organization"
openssl x509 -req -days 365 -CA example.com.crt -CAkey example.com.key -set_serial 0 -in www.example.com.csr -out www.example.com.crt
Store the cert/key in a Secret:
kubectl create secret tls example-cert --key=www.example.com.key --cert=www.example.com.crt
Update the Gateway from the Quickstart guide to include an HTTPS listener that listens on port 443 and references the
example-cert Secret:
kubectl patch gateway eg --type=json --patch '[{
   "op": "add",
   "path": "/spec/listeners/-",
   "value": {
      "name": "https",
      "protocol": "HTTPS",
      "port": 443,
      "tls": {
        "mode": "Terminate",
        "certificateRefs": [{
          "kind": "Secret",
          "group": "",
          "name": "example-cert",
        }],
      },
    },
}]'
Verify the Gateway status:
kubectl get gateway/eg -o yaml
Testing
Clusters without External LoadBalancer Support
Get the name of the Envoy service created the by the example Gateway:
export ENVOY_SERVICE=$(kubectl get svc -n envoy-gateway-system --selector=gateway.envoyproxy.io/owning-gateway-namespace=default,gateway.envoyproxy.io/owning-gateway-name=eg -o jsonpath='{.items[0].metadata.name}')
Port forward to the Envoy service:
kubectl -n envoy-gateway-system port-forward service/${ENVOY_SERVICE} 8443:443 &
Query the example app through Envoy proxy:
curl -v -HHost:www.example.com --resolve "www.example.com:8443:127.0.0.1" \
--cacert example.com.crt https://www.example.com:8443/get
Clusters with External LoadBalancer Support
Get the External IP of the Gateway:
export GATEWAY_HOST=$(kubectl get gateway/eg -o jsonpath='{.status.addresses[0].value}')
Query the example app through the Gateway:
curl -v -HHost:www.example.com --resolve "www.example.com:443:${GATEWAY_HOST}" \
--cacert example.com.crt https://www.example.com/get
Multiple HTTPS Listeners
Create a TLS cert/key for the additional HTTPS listener:
openssl req -out foo.example.com.csr -newkey rsa:2048 -nodes -keyout foo.example.com.key -subj "/CN=foo.example.com/O=example organization"
openssl x509 -req -days 365 -CA example.com.crt -CAkey example.com.key -set_serial 0 -in foo.example.com.csr -out foo.example.com.crt
Store the cert/key in a Secret:
kubectl create secret tls foo-cert --key=foo.example.com.key --cert=foo.example.com.crt
Create another HTTPS listener on the example Gateway:
kubectl patch gateway eg --type=json --patch '[{
   "op": "add",
   "path": "/spec/listeners/-",
   "value": {
      "name": "https-foo",
      "protocol": "HTTPS",
      "port": 443,
      "hostname": "foo.example.com",
      "tls": {
        "mode": "Terminate",
        "certificateRefs": [{
          "kind": "Secret",
          "group": "",
          "name": "foo-cert",
        }],
      },
    },
}]'
Update the HTTPRoute to route traffic for hostname foo.example.com to the example backend service:
kubectl patch httproute backend --type=json --patch '[{
   "op": "add",
   "path": "/spec/hostnames/-",
   "value": "foo.example.com",
}]'
Verify the Gateway status:
kubectl get gateway/eg -o yaml
Follow the steps in the Testing section to test connectivity to the backend app through both Gateway
listeners. Replace www.example.com with foo.example.com to test the new HTTPS listener.
Cross Namespace Certificate References
A Gateway can be configured to reference a certificate in a different namespace. This is allowed by a ReferenceGrant
created in the target namespace. Without the ReferenceGrant, a cross-namespace reference is invalid.
Before proceeding, ensure you can query the HTTPS backend service from the Testing section.
To demonstrate cross namespace certificate references, create a ReferenceGrant that allows Gateways from the “default”
namespace to reference Secrets in the “envoy-gateway-system” namespace:
$ cat <<EOF | kubectl apply -f -
apiVersion: gateway.networking.k8s.io/v1alpha2
kind: ReferenceGrant
metadata:
  name: example
  namespace: envoy-gateway-system
spec:
  from:
  - group: gateway.networking.k8s.io
    kind: Gateway
    namespace: default
  to:
  - group: ""
    kind: Secret
EOF
Delete the previously created Secret:
kubectl delete secret/example-cert
The Gateway HTTPS listener should now surface the Ready: False status condition and the example HTTPS backend should
no longer be reachable through the Gateway.
kubectl get gateway/eg -o yaml
Recreate the example Secret in the envoy-gateway-system namespace:
kubectl create secret tls example-cert -n envoy-gateway-system --key=www.example.com.key --cert=www.example.com.crt
Update the Gateway HTTPS listener with namespace: envoy-gateway-system, for example:
$ cat <<EOF | kubectl apply -f -
apiVersion: gateway.networking.k8s.io/v1beta1
kind: Gateway
metadata:
  name: eg
spec:
  gatewayClassName: eg
  listeners:
    - name: http
      protocol: HTTP
      port: 80
    - name: https
      protocol: HTTPS
      port: 443
      tls:
        mode: Terminate
        certificateRefs:
          - kind: Secret
            group: ""
            name: example-cert
            namespace: envoy-gateway-system
EOF
The Gateway HTTPS listener status should now surface the Ready: True condition and you should once again be able to
query the HTTPS backend through the Gateway.
Lastly, test connectivity using the above Testing section.
Clean-Up
Follow the steps from the Quickstart Guide to uninstall Envoy Gateway and the example manifest.
Delete the Secrets:
kubectl delete secret/example-cert
kubectl delete secret/foo-cert
Next Steps
Checkout the Developer Guide to get involved in the project.
2.12 - TCP Routing
TCPRoute provides a way to route TCP requests. When combined with a Gateway listener, it can be used to forward
connections on the port specified by the listener to a set of backends specified by the TCPRoute. To learn more about
HTTP routing, refer to the Gateway API documentation.
Installation
Install Envoy Gateway:
kubectl apply -f https://github.com/envoyproxy/gateway/releases/download/v0.3.0/install.yaml
Wait for Envoy Gateway to become available:
kubectl wait --timeout=5m -n envoy-gateway-system deployment/envoy-gateway --for=condition=Available
Configuration
In this example, we have one Gateway resource and two TCPRoute resources that distribute the traffic with the following
rules:
All TCP streams on port 8088 of the Gateway are forwarded to port 3001 of foo Kubernetes Service.
All TCP streams on port 8089 of the Gateway are forwarded to port 3002 of bar Kubernetes Service.
In this example two TCP listeners will be applied to the Gateway in order to route them to two separate backend
TCPRoutes, note that the protocol set for the listeners on the Gateway is TCP:
Install the GatewayClass and a tcp-gateway Gateway first.
cat <<EOF | kubectl apply -f -
kind: GatewayClass
apiVersion: gateway.networking.k8s.io/v1beta1
metadata:
  name: eg
spec:
  controllerName: gateway.envoyproxy.io/gatewayclass-controller
---
apiVersion: gateway.networking.k8s.io/v1beta1
kind: Gateway
metadata:
  name: tcp-gateway
spec:
  gatewayClassName: eg
  listeners:
  - name: foo
    protocol: TCP
    port: 8088
    allowedRoutes:
      kinds:
      - kind: TCPRoute
  - name: bar
    protocol: TCP
    port: 8089
    allowedRoutes:
      kinds:
      - kind: TCPRoute
EOF
Install two services foo and bar, which are binded to backend-1 and backend-2.
cat <<EOF | kubectl apply -f -
apiVersion: v1
kind: Service
metadata:
  name: foo
  labels:
    app: backend-1
spec:
  ports:
    - name: http
      port: 3001
      targetPort: 3000
  selector:
    app: backend-1
---
apiVersion: v1
kind: Service
metadata:
  name: bar
  labels:
    app: backend-2
spec:
  ports:
    - name: http
      port: 3002
      targetPort: 3000
  selector:
    app: backend-2
---
apiVersion: apps/v1
kind: Deployment
metadata:
  name: backend-1
spec:
  replicas: 1
  selector:
    matchLabels:
      app: backend-1
      version: v1
  template:
    metadata:
      labels:
        app: backend-1
        version: v1
    spec:
      containers:
        - image: gcr.io/k8s-staging-ingressconformance/echoserver:v20221109-7ee2f3e
          imagePullPolicy: IfNotPresent
          name: backend-1
          ports:
            - containerPort: 3000
          env:
            - name: POD_NAME
              valueFrom:
                fieldRef:
                  fieldPath: metadata.name
            - name: NAMESPACE
              valueFrom:
                fieldRef:
                  fieldPath: metadata.namespace
            - name: SERVICE_NAME
              value: foo
---
apiVersion: apps/v1
kind: Deployment
metadata:
  name: backend-2
spec:
  replicas: 1
  selector:
    matchLabels:
      app: backend-2
      version: v1
  template:
    metadata:
      labels:
        app: backend-2
        version: v1
    spec:
      containers:
        - image: gcr.io/k8s-staging-ingressconformance/echoserver:v20221109-7ee2f3e
          imagePullPolicy: IfNotPresent
          name: backend-2
          ports:
            - containerPort: 3000
          env:
            - name: POD_NAME
              valueFrom:
                fieldRef:
                  fieldPath: metadata.name
            - name: NAMESPACE
              valueFrom:
                fieldRef:
                  fieldPath: metadata.namespace
            - name: SERVICE_NAME
              value: bar
EOF
Install two TCPRoutes tcp-app-1 and tcp-app-2 with different sectionName:
cat <<EOF | kubectl apply -f -
apiVersion: gateway.networking.k8s.io/v1alpha2
kind: TCPRoute
metadata:
  name: tcp-app-1
spec:
  parentRefs:
  - name: tcp-gateway
    sectionName: foo
  rules:
  - backendRefs:
    - name: foo
      port: 3001
---
apiVersion: gateway.networking.k8s.io/v1alpha2
kind: TCPRoute
metadata:
  name: tcp-app-2
spec:
  parentRefs:
  - name: tcp-gateway
    sectionName: bar
  rules:
  - backendRefs:
    - name: bar
      port: 3002
EOF
In the above example we separate the traffic for the two separate backend TCP Services by using the sectionName field in
the parentRefs:
spec:
  parentRefs:
  - name: tcp-gateway
    sectionName: foo
This corresponds directly with the name in the listeners in the Gateway:
  listeners:
  - name: foo
    protocol: TCP
    port: 8088
  - name: bar
    protocol: TCP
    port: 8089
In this way each TCPRoute “attaches” itself to a different port on the Gateway so that the foo service
is taking traffic for port 8088 from outside the cluster and bar service takes the port 8089 traffic.
Before testing, please get the tcp-gateway Gateway’s address first:
export GATEWAY_HOST=$(kubectl get gateway/tcp-gateway -o jsonpath='{.status.addresses[0].value}')
You can try to use nc to test the TCP connections of envoy gateway with different ports, and you can see them succeeded:
nc -zv ${GATEWAY_HOST} 8088

nc -zv ${GATEWAY_HOST} 8089
You can also try to send requests to envoy gateway and get responses as shown below:
curl -i "http://${GATEWAY_HOST}:8088"

HTTP/1.1 200 OK
Content-Type: application/json
X-Content-Type-Options: nosniff
Date: Tue, 03 Jan 2023 10:18:36 GMT
Content-Length: 267

{
 "path": "/",
 "host": "xxx.xxx.xxx.xxx:8088",
 "method": "GET",
 "proto": "HTTP/1.1",
 "headers": {
  "Accept": [
   "*/*"
  ],
  "User-Agent": [
   "curl/7.85.0"
  ]
 },
 "namespace": "default",
 "ingress": "",
 "service": "foo",
 "pod": "backend-1-c6c5fb958-dl8vl"
}
You can see that the traffic routing to foo service when sending request to 8088 port.
curl -i "http://${GATEWAY_HOST}:8089"

HTTP/1.1 200 OK
Content-Type: application/json
X-Content-Type-Options: nosniff
Date: Tue, 03 Jan 2023 10:19:28 GMT
Content-Length: 267

{
 "path": "/",
 "host": "xxx.xxx.xxx.xxx:8089",
 "method": "GET",
 "proto": "HTTP/1.1",
 "headers": {
  "Accept": [
   "*/*"
  ],
  "User-Agent": [
   "curl/7.85.0"
  ]
 },
 "namespace": "default",
 "ingress": "",
 "service": "bar",
 "pod": "backend-2-98fcff498-hcmgb"
}
You can see that the traffic routing to bar service when sending request to 8089 port.
2.13 - TLS Passthrough
This guide will walk through the steps required to configure TLS Passthrough via Envoy Gateway. Unlike configuring
Secure Gateways, where the Gateway terminates the client TLS connection, TLS Passthrough allows the application itself
to terminate the TLS connection, while the Gateway routes the requests to the application based on SNI headers.
Prerequisites
- OpenSSL to generate TLS assets.
Installation
Follow the steps from the Quickstart Guide to install Envoy Gateway and the example manifest.
Before proceeding, you should be able to query the example backend using HTTP.
TLS Certificates
Generate the certificates and keys used by the Service to terminate client TLS connections.
For the application, we’ll deploy a sample echoserver app, with the certificates loaded in the application Pod.
Note: These certificates will not be used by the Gateway, but will remain in the application scope.
Create a root certificate and private key to sign certificates:
openssl req -x509 -sha256 -nodes -days 365 -newkey rsa:2048 -subj '/O=example Inc./CN=example.com' -keyout example.com.key -out example.com.crt
Create a certificate and a private key for passthrough.example.com:
openssl req -out passthrough.example.com.csr -newkey rsa:2048 -nodes -keyout passthrough.example.com.key -subj "/CN=passthrough.example.com/O=some organization"
openssl x509 -req -sha256 -days 365 -CA example.com.crt -CAkey example.com.key -set_serial 0 -in passthrough.example.com.csr -out passthrough.example.com.crt
Store the cert/keys in A Secret:
kubectl create secret tls server-certs --key=passthrough.example.com.key --cert=passthrough.example.com.crt
Deployment
Deploy TLS Passthrough application Deployment, Service and TLSRoute:
kubectl apply -f https://raw.githubusercontent.com/envoyproxy/gateway/v0.3.0/examples/kubernetes/tls-passthrough.yaml
Patch the Gateway from the Quickstart guide to include a TLS listener that listens on port 6443 and is configured for
TLS mode Passthrough:
kubectl patch gateway eg --type=json --patch '[{
   "op": "add",
   "path": "/spec/listeners/-",
   "value": {
      "name": "tls",
      "protocol": "TLS",
      "hostname": "passthrough.example.com",
      "tls": {"mode": "Passthrough"},
      "port": 6443,
    },
}]'
Testing
Clusters without External LoadBalancer Support
Get the name of the Envoy service created the by the example Gateway:
export ENVOY_SERVICE=$(kubectl get svc -n envoy-gateway-system --selector=gateway.envoyproxy.io/owning-gateway-namespace=default,gateway.envoyproxy.io/owning-gateway-name=eg -o jsonpath='{.items[0].metadata.name}')
Port forward to the Envoy service:
kubectl -n envoy-gateway-system port-forward service/${ENVOY_SERVICE} 6043:6443 &
Curl the example app through Envoy proxy:
curl -v --resolve "passthrough.example.com:6043:127.0.0.1" https://passthrough.example.com:6043 \
--cacert passthrough.example.com.crt
Clusters with External LoadBalancer Support
You can also test the same functionality by sending traffic to the External IP of the Gateway:
export GATEWAY_HOST=$(kubectl get gateway/eg -o jsonpath='{.status.addresses[0].value}')
Curl the example app through the Gateway, e.g. Envoy proxy:
curl -v -HHost:passthrough.example.com --resolve "passthrough.example.com:6443:${GATEWAY_HOST}" \
--cacert example.com.crt https://passthrough.example.com:6443/get
Clean-Up
Follow the steps from the Quickstart Guide to uninstall Envoy Gateway and the example manifest.
Delete the Secret:
kubectl delete secret/server-certs
Next Steps
Checkout the Developer Guide to get involved in the project.
2.14 - UDP Routing
The UDPRoute resource allows users to configure UDP routing by matching UDP traffic and forwarding it to Kubernetes
backends. This guide will use CoreDNS example to walk you through the steps required to configure UDPRoute on Envoy
Gateway.
Note: UDPRoute allows Envoy Gateway to operate as a non-transparent proxy between a UDP client and server. The lack
of transparency means that the upstream server will see the source IP and port of the Gateway instead of the client.
For additional information, refer to Envoy’s UDP proxy documentation.
Prerequisites
Install Envoy Gateway:
kubectl apply -f https://github.com/envoyproxy/gateway/releases/download/v0.3.0/install.yaml
Wait for Envoy Gateway to become available:
kubectl wait --timeout=5m -n envoy-gateway-system deployment/envoy-gateway --for=condition=Available
Installation
Install CoreDNS in the Kubernetes cluster as the example backend. The installed CoreDNS is listening on
UDP port 53 for DNS lookups.
kubectl apply -f https://raw.githubusercontent.com/envoyproxy/gateway/v0.3.0/examples/kubernetes/udp-routing-example-backend.yaml
Wait for the CoreDNS deployment to become available:
kubectl wait --timeout=5m deployment/coredns --for=condition=Available
Update the Gateway from the Quickstart guide to include a UDP listener that listens on UDP port 5300:
kubectl patch gateway eg --type=json --patch '[{
   "op": "add",
   "path": "/spec/listeners/-",
   "value": {
      "name": "coredns",
      "protocol": "UDP",
      "port": 5300,
      "allowedRoutes": {
         "kinds": [{
            "kind": "UDPRoute"
          }]
      }
    },
}]'
Verify the Gateway status:
kubectl get gateway/eg -o yaml
Configuration
Create a UDPRoute resource to route UDP traffic received on Gateway port 5300 to the CoredDNS backend.
cat <<EOF | kubectl apply -f -
apiVersion: gateway.networking.k8s.io/v1alpha2
kind: UDPRoute
metadata:
  name: coredns
spec:
  parentRefs:
    - name: eg
      sectionName: coredns
  rules:
    - backendRefs:
        - name: coredns
          port: 53
EOF
Verify the UDPRoute status:
kubectl get udproute/coredns -o yaml
Testing
Get the External IP of the Gateway:
export GATEWAY_HOST=$(kubectl get gateway/eg -o jsonpath='{.status.addresses[0].value}')
Use dig command to query the dns entry foo.bar.com through the Gateway.
dig @${GATEWAY_HOST} -p 5300 foo.bar.com
You should see the result of the dns query as the below output, which means that the dns query has been successfully
routed to the backend CoreDNS.
Note: 49.51.177.138 is the resolved address of GATEWAY_HOST.
; <<>> DiG 9.18.1-1ubuntu1.1-Ubuntu <<>> @49.51.177.138 -p 5300 foo.bar.com
; (1 server found)
;; global options: +cmd
;; Got answer:
;; ->>HEADER<<- opcode: QUERY, status: NOERROR, id: 58125
;; flags: qr aa rd; QUERY: 1, ANSWER: 0, AUTHORITY: 0, ADDITIONAL: 3
;; WARNING: recursion requested but not available

;; OPT PSEUDOSECTION:
; EDNS: version: 0, flags:; udp: 1232
; COOKIE: 24fb86eba96ebf62 (echoed)
;; QUESTION SECTION:
;foo.bar.com.			IN	A

;; ADDITIONAL SECTION:
foo.bar.com.		0	IN	A	10.244.0.19
_udp.foo.bar.com.	0	IN	SRV	0 0 42376 .

;; Query time: 1 msec
;; SERVER: 49.51.177.138#5300(49.51.177.138) (UDP)
;; WHEN: Fri Jan 13 10:20:34 UTC 2023
;; MSG SIZE  rcvd: 114
Clean-Up
Follow the steps from the Quickstart Guide to uninstall Envoy Gateway.
Delete the CoreDNS example manifest and the UDPRoute:
kubectl delete deploy/coredns
kubectl delete service/coredns
kubectl delete cm/coredns
kubectl delete udproute/coredns
Next Steps
Checkout the Developer Guide to get involved in the project.
3 - API
This section includes APIs of Envoy Gateway.
3.1 - Config APIs
Packages
config.gateway.envoyproxy.io/v1alpha1
Package v1alpha1 contains API schema definitions for the config.gateway.envoyproxy.io
API group.
Resource Types
EnvoyGateway
EnvoyGateway is the schema for the envoygateways API.
| Field | Description |
|---|
apiVersion string | config.gateway.envoyproxy.io/v1alpha1 |
kind string | EnvoyGateway |
EnvoyGatewaySpec EnvoyGatewaySpec | EnvoyGatewaySpec defines the desired state of EnvoyGateway. |
EnvoyGatewaySpec
EnvoyGatewaySpec defines the desired state of Envoy Gateway.
Appears in:
| Field | Description |
|---|
gateway Gateway | Gateway defines desired Gateway API specific configuration. If unset, default configuration parameters will apply. |
provider Provider | Provider defines the desired provider and provider-specific configuration. If unspecified, the Kubernetes provider is used with default configuration parameters. |
rateLimit RateLimit | RateLimit defines the configuration associated with the Rate Limit service deployed by Envoy Gateway required to implement the Global Rate limiting functionality. The specific rate limit service used here is the reference implementation in Envoy. For more details visit https://github.com/envoyproxy/ratelimit. This configuration is unneeded for “Local” rate limiting. |
EnvoyProxy
EnvoyProxy is the schema for the envoyproxies API.
| Field | Description |
|---|
apiVersion string | config.gateway.envoyproxy.io/v1alpha1 |
kind string | EnvoyProxy |
metadata ObjectMeta | Refer to Kubernetes API documentation for fields of metadata. |
spec EnvoyProxySpec | EnvoyProxySpec defines the desired state of EnvoyProxy. |
EnvoyProxySpec
EnvoyProxySpec defines the desired state of EnvoyProxy.
Appears in:
| Field | Description |
|---|
provider ResourceProvider | Provider defines the desired resource provider and provider-specific configuration. If unspecified, the “Kubernetes” resource provider is used with default configuration parameters. |
logging ProxyLogging | Logging defines logging parameters for managed proxies. If unspecified, default settings apply. This type is not implemented until https://github.com/envoyproxy/gateway/issues/280 is fixed. |
FileProvider
FileProvider defines configuration for the File provider.
Appears in:
Gateway
Gateway defines the desired Gateway API configuration of Envoy Gateway.
Appears in:
KubernetesDeploymentSpec
KubernetesDeploymentSpec defines the desired state of the Kubernetes deployment resource.
Appears in:
| Field | Description |
|---|
replicas integer | Replicas is the number of desired pods. Defaults to 1. |
KubernetesProvider
KubernetesProvider defines configuration for the Kubernetes provider.
Appears in:
KubernetesResourceProvider
KubernetesResourceProvider defines configuration for the Kubernetes resource provider.
Appears in:
| Field | Description |
|---|
envoyDeployment KubernetesDeploymentSpec | EnvoyDeployment defines the desired state of the Envoy deployment resource. If unspecified, default settings for the managed Envoy deployment resource are applied. |
LogComponent
Underlying type: string
LogComponent defines a component that supports a configured logging level. This type is not implemented until https://github.com/envoyproxy/gateway/issues/280 is fixed.
Appears in:
LogLevel
Underlying type: string
LogLevel defines a log level for system logs. This type is not implemented until https://github.com/envoyproxy/gateway/issues/280 is fixed.
Appears in:
Provider
Provider defines the desired configuration of a provider.
Appears in:
| Field | Description |
|---|
type ProviderType | Type is the type of provider to use. Supported types are “Kubernetes”. |
kubernetes KubernetesProvider | Kubernetes defines the configuration of the Kubernetes provider. Kubernetes provides runtime configuration via the Kubernetes API. |
file FileProvider | File defines the configuration of the File provider. File provides runtime configuration defined by one or more files. This type is not implemented until https://github.com/envoyproxy/gateway/issues/1001 is fixed. |
ProviderType
Underlying type: string
ProviderType defines the types of providers supported by Envoy Gateway.
Appears in:
ProxyLogging
ProxyLogging defines logging parameters for managed proxies. This type is not implemented until https://github.com/envoyproxy/gateway/issues/280 is fixed.
Appears in:
| Field | Description |
|---|
level object (keys:LogComponent, values:LogLevel) | Level is a map of logging level per component, where the component is the key and the log level is the value. If unspecified, defaults to “System: Info”. |
RateLimit
RateLimit defines the configuration associated with the Rate Limit Service used for Global Rate Limiting.
Appears in:
| Field | Description |
|---|
backend RateLimitDatabaseBackend | Backend holds the configuration associated with the database backend used by the rate limit service to store state associated with global ratelimiting. |
RateLimitDatabaseBackend
RateLimitDatabaseBackend defines the configuration associated with the database backend used by the rate limit service.
Appears in:
RateLimitDatabaseBackendType
Underlying type: string
RateLimitDatabaseBackendType specifies the types of database backend to be used by the rate limit service.
Appears in:
RateLimitRedisSettings
RateLimitRedisSettings defines the configuration for connecting to a Redis database.
Appears in:
| Field | Description |
|---|
url string | URL of the Redis Database. |
ResourceProvider
ResourceProvider defines the desired state of a resource provider.
Appears in:
| Field | Description |
|---|
type ProviderType | Type is the type of resource provider to use. A resource provider provides infrastructure resources for running the data plane, e.g. Envoy proxy, and optional auxiliary control planes. Supported types are “Kubernetes”. |
kubernetes KubernetesResourceProvider | Kubernetes defines the desired state of the Kubernetes resource provider. Kubernetes provides infrastructure resources for running the data plane, e.g. Envoy proxy. If unspecified and type is “Kubernetes”, default settings for managed Kubernetes resources are applied. |
3.2 - Extension APIs
Packages
gateway.envoyproxy.io/v1alpha1
Package v1alpha1 contains API schema definitions for the gateway.envoyproxy.io API group.
Resource Types
AuthenticationFilter
| Field | Description |
|---|
apiVersion string | gateway.envoyproxy.io/v1alpha1 |
kind string | AuthenticationFilter |
metadata ObjectMeta | Refer to Kubernetes API documentation for fields of metadata. |
spec AuthenticationFilterSpec | Spec defines the desired state of the AuthenticationFilter type. |
AuthenticationFilterSpec
AuthenticationFilterSpec defines the desired state of the AuthenticationFilter type.
Appears in:
AuthenticationFilterType
Underlying type: string
AuthenticationFilterType is a type of authentication provider.
Appears in:
GlobalRateLimit
GlobalRateLimit defines global rate limit configuration.
Appears in:
| Field | Description |
|---|
rules RateLimitRule array | Rules are a list of RateLimit selectors and limits. Each rule and its associated limit is applied in a mutually exclusive way i.e. if multiple rules get selected, each of their associated limits get applied, so a single traffic request might increase the rate limit counters for multiple rules if selected. |
HeaderMatch defines the match attributes within the HTTP Headers of the request.
Appears in:
| Field | Description |
|---|
type HeaderMatchType | Type specifies how to match against the value of the header. |
name string | Name of the HTTP header. |
value string | Value within the HTTP header. Due to the case-insensitivity of header names, “foo” and “Foo” are considered equivalent. Do not set this field when Type=“Distinct”, implying matching on any/all unique values within the header. |
Underlying type: string
HeaderMatchType specifies the semantics of how HTTP header values should be compared. Valid HeaderMatchType values are “Exact”, “RegularExpression”, and “Distinct”.
Appears in:
JwtAuthenticationFilterProvider
JwtAuthenticationFilterProvider defines the JSON Web Token (JWT) authentication provider type and how JWTs should be verified:
Appears in:
| Field | Description |
|---|
name string | Name defines a unique name for the JWT provider. A name can have a variety of forms, including RFC1123 subdomains, RFC 1123 labels, or RFC 1035 labels. |
issuer string | Issuer is the principal that issued the JWT and takes the form of a URL or email address. For additional details, see https://tools.ietf.org/html/rfc7519#section-4.1.1 for URL format and https://rfc-editor.org/rfc/rfc5322.html for email format. If not provided, the JWT issuer is not checked. |
audiences string array | Audiences is a list of JWT audiences allowed access. For additional details, see https://tools.ietf.org/html/rfc7519#section-4.1.3. If not provided, JWT audiences are not checked. |
remoteJWKS RemoteJWKS | RemoteJWKS defines how to fetch and cache JSON Web Key Sets (JWKS) from a remote HTTP/HTTPS endpoint. |
RateLimitFilter
RateLimitFilter allows the user to limit the number of incoming requests to a predefined value based on attributes within the traffic flow.
| Field | Description |
|---|
apiVersion string | gateway.envoyproxy.io/v1alpha1 |
kind string | RateLimitFilter |
metadata ObjectMeta | Refer to Kubernetes API documentation for fields of metadata. |
spec RateLimitFilterSpec | Spec defines the desired state of RateLimitFilter. |
RateLimitFilterSpec
RateLimitFilterSpec defines the desired state of RateLimitFilter.
Appears in:
| Field | Description |
|---|
type RateLimitType | Type decides the scope for the RateLimits. Valid RateLimitType values are “Global”. |
global GlobalRateLimit | Global defines global rate limit configuration. |
RateLimitRule
RateLimitRule defines the semantics for matching attributes from the incoming requests, and setting limits for them.
Appears in:
| Field | Description |
|---|
clientSelectors RateLimitSelectCondition array | ClientSelectors holds the list of select conditions to select specific clients using attributes from the traffic flow. All individual select conditions must hold True for this rule and its limit to be applied. If this field is empty, it is equivalent to True, and the limit is applied. |
limit RateLimitValue | Limit holds the rate limit values. This limit is applied for traffic flows when the selectors compute to True, causing the request to be counted towards the limit. The limit is enforced and the request is ratelimited, i.e. a response with 429 HTTP status code is sent back to the client when the selected requests have reached the limit. |
RateLimitSelectCondition
RateLimitSelectCondition specifies the attributes within the traffic flow that can be used to select a subset of clients to be ratelimited. All the individual conditions must hold True for the overall condition to hold True.
Appears in:
| Field | Description |
|---|
headers HeaderMatch array | Headers is a list of request headers to match. Multiple header values are ANDed together, meaning, a request MUST match all the specified headers. |
RateLimitType
Underlying type: string
RateLimitType specifies the types of RateLimiting.
Appears in:
RateLimitUnit
Underlying type: string
RateLimitUnit specifies the intervals for setting rate limits. Valid RateLimitUnit values are “Second”, “Minute”, “Hour”, and “Day”.
Appears in:
RateLimitValue
RateLimitValue defines the limits for rate limiting.
Appears in:
RemoteJWKS
RemoteJWKS defines how to fetch and cache JSON Web Key Sets (JWKS) from a remote HTTP/HTTPS endpoint.
Appears in:
| Field | Description |
|---|
uri string | URI is the HTTPS URI to fetch the JWKS. Envoy’s system trust bundle is used to validate the server certificate. |
4 - Get Involved
This section includes contents related to Contributions
4.1 - Roadmap
This section records the roadmap of Envoy Gateway.
This document serves as a high-level reference for Envoy Gateway users and contributors to understand the direction of
the project.
Contributing to the Roadmap
- To add a feature to the roadmap, create an issue or join a community meeting to discuss your use
case. If your feature is accepted, a maintainer will assign your issue to a release milestone and update
this document accordingly.
- To help with an existing roadmap item, comment on or assign yourself to the associated issue.
- If a roadmap item doesn’t have an issue, create one, assign yourself to the issue, and reference this document. A
maintainer will submit a pull request to add the feature to the roadmap. Note: The feature should be
discussed in an issue or a community meeting before implementing it.
If you don’t know where to start contributing, help is needed to reduce technical, automation, and documentation debt.
Look for issues with the help wanted label to get started.
Details
Roadmap features and timelines may change based on feedback, community contributions, etc. If you depend on a specific
roadmap item, you’re encouraged to attend a community meeting to discuss the details, or help us deliver the feature by
contributing to the project.
Last Updated: November 2022
v0.2.0: Establish a Solid Foundation
- Complete the core Envoy Gateway implementation- Issue #60.
- Establish initial testing, e2e, integration, etc- Issue #64.
- Establish user and developer project documentation- Issue #17.
- Achieve Gateway API conformance (e.g. routing, LB, Header transformation, etc.)- Issue #65.
- Setup a CI/CD pipeline- Issue #63.
v0.3.0: Drive Advanced Features through Extension Mechanisms
v0.4.0: Customizing Envoy Gateway
v0.5.0: Observability and Scale
- Observability for control plane and data plane Issue #701.
4.2 - Developer Guide
This section tells how to develop Envoy Gateway.
Envoy Gateway is built using a make-based build system. Our CI is based on Github Actions using workflows.
Prerequisites
go
make
docker
python3
- Need a
python3 program - Must have a functioning
venv module; this is part of the standard
library, but some distributions (such as Debian and Ubuntu) replace
it with a stub and require you to install a python3-venv package
separately.
Quickstart
- Run
make help to see all the available targets to build, test and run Envoy Gateway.
Building
- Run
make build to build all the binaries. - Run
make build BINS="envoy-gateway" to build the Envoy Gateway binary. - Run
make build BINS="egctl" to build the egctl binary.
Note: The binaries get generated in the bin/$OS/$ARCH directory, for example, bin/linux/amd64/.
Testing
Running Linters
- Run
make lint to make sure your code passes all the linter checks.
Note: The golangci-lint configuration resides here.
Building and Pushing the Image
- Run
IMAGE=docker.io/you/gateway-dev make image to build the docker image. - Run
IMAGE=docker.io/you/gateway-dev make push-multiarch to build and push the multi-arch docker image.
Note: Replace IMAGE with your registry’s image name.
Deploying Envoy Gateway for Test/Dev
- Run
make create-cluster to create a Kind cluster.
Option 1: Use the Latest gateway-dev Image
- Run
TAG=latest make kube-deploy to deploy Envoy Gateway in the Kind cluster using the latest image. Replace latest
to use a different image tag.
Option 2: Use a Custom Image
- Run
make kube-install-image to build an image from the tip of your current branch and load it in the Kind cluster. - Run
IMAGE_PULL_POLICY=IfNotPresent make kube-deploy to install Envoy Gateway into the Kind cluster using your custom image.
Deploying Envoy Gateway in Kubernetes
- Run
TAG=latest make kube-deploy to deploy Envoy Gateway using the latest image into a Kubernetes cluster (linked to
the current kube context). Preface the command with IMAGE or replace TAG to use a different Envoy Gateway image or
tag. - Run
make kube-undeploy to uninstall Envoy Gateway from the cluster.
Note: Envoy Gateway is tested against Kubernetes v1.24.0.
Demo Setup
- Run
make kube-demo to deploy a demo backend service, gatewayclass, gateway and httproute resource
(similar to steps outlined in the Quickstart docs) and test the configuration. - Run
make kube-demo-undeploy to delete the resources created by the make kube-demo command.
The commands below deploy Envoy Gateway to a Kubernetes cluster and run the Gateway API conformance tests. Refer to the
Gateway API conformance homepage to learn more about the tests. If Envoy Gateway is already installed, run
TAG=latest make run-conformance to run the conformance tests.
On a Linux Host
- Run
TAG=latest make conformance to create a Kind cluster, install Envoy Gateway using the latest gateway-dev
image, and run Gateway API conformance tests.
On a Mac Host
Since Mac doesn’t support directly exposing the Docker network to the Mac host, use one of the following
workarounds to run conformance tests:
- Deploy your own Kubernetes cluster or use Docker Desktop with Kubernetes support and then run
TAG=latest make kube-deploy run-conformance. This will install Envoy Gateway using the latest gateway-dev image
to the Kubernetes cluster using the current kubectl context and run the conformance tests. Use make kube-undeploy to
uninstall Envoy Gateway. - Install and run Docker Mac Net Connect and then run
TAG=latest make conformance.
Note: Preface commands with IMAGE or replace TAG to use a different Envoy Gateway image or tag. If TAG
is unspecified, the short SHA of your current branch is used.
Debugging the Envoy Config
An easy way to view the envoy config that Envoy Gateway is using is to port-forward to the admin interface port
(currently 19000) on the Envoy deployment that corresponds to a Gateway so that it can be accessed locally.
Get the name of the Envoy deployment. The following example is for Gateway eg in the default namespace:
export ENVOY_DEPLOYMENT=$(kubectl get deploy -n envoy-gateway-system --selector=gateway.envoyproxy.io/owning-gateway-namespace=default,gateway.envoyproxy.io/owning-gateway-name=eg -o jsonpath='{.items[0].metadata.name}')
Port forward the admin interface port:
kubectl port-forward deploy/${ENVOY_DEPLOYMENT} -n envoy-gateway-system 19000:19000
Now you are able to view the running Envoy configuration by navigating to 127.0.0.1:19000/config_dump.
There are many other endpoints on the Envoy admin interface that may be helpful when debugging.
JWT Testing
An example JSON Web Token (JWT) and JSON Web Key Set (JWKS) are used for the request authentication
user guide. The JWT was created by the JWT Debugger, using the RS256 algorithm. The public key from the JWTs
verify signature was copied to JWK Creator for generating the JWK. The JWK Creator was configured with matching
settings, i.e. Signing public key use and the RS256 algorithm. The generated JWK was wrapped in a JWKS structure
and is hosted in the repo.
4.3 - Contributing
This section tells how to contribute to Envoy Gateway.
We welcome contributions from the community. Please carefully review the project goals
and following guidelines to streamline your contributions.
Communication
- Before starting work on a major feature, please contact us via GitHub or Slack. We will ensure no
one else is working on it and ask you to open a GitHub issue.
- A “major feature” is defined as any change that is > 100 LOC altered (not including tests), or
changes any user-facing behavior. We will use the GitHub issue to discuss the feature and come to
agreement. This is to prevent your time being wasted, as well as ours. The GitHub review process
for major features is also important so that affiliations with commit access can
come to agreement on the design. If it’s appropriate to write a design document, the document must
be hosted either in the GitHub issue, or linked to from the issue and hosted in a world-readable
location.
- Small patches and bug fixes don’t need prior communication.
Inclusivity
The Envoy Gateway community has an explicit goal to be inclusive to all. As such, all PRs must adhere
to the following guidelines for all code, APIs, and documentation:
- The following words and phrases are not allowed:
- Whitelist: use allowlist instead.
- Blacklist: use denylist or blocklist instead.
- Master: use primary instead.
- Slave: use secondary or replica instead.
- Documentation should be written in an inclusive style. The Google developer
documentation contains an excellent
reference on this topic.
- The above policy is not considered definitive and may be amended in the future as industry best
practices evolve. Additional comments on this topic may be provided by maintainers during code
review.
Submitting a PR
- Fork the repo.
- Hack
- DCO sign-off each commit. This can be done with
git commit -s. - Submit your PR.
- Tests will automatically run for you.
- We will not merge any PR that is not passing tests.
- PRs are expected to have 100% test coverage for added code. This can be verified with a coverage
build. If your PR cannot have 100% coverage for some reason please clearly explain why when you
open it.
- Any PR that changes user-facing behavior must have associated documentation in the docs folder of the repo as
well as the changelog.
- All code comments and documentation are expected to have proper English grammar and punctuation.
If you are not a fluent English speaker (or a bad writer ;-)) please let us know and we will try
to find some help but there are no guarantees.
- Your PR title should be descriptive, and generally start with type that contains a subsystem name with
() if necessary
and summary followed by a colon. format chore/docs/feat/fix/refactor/style/test: summary.
Examples:- “docs: fix grammar error”
- “feat(translator): add new feature”
- “fix: fix xx bug”
- “chore: change ci & build tools etc”
- Your PR commit message will be used as the commit message when your PR is merged. You should
update this field if your PR diverges during review.
- Your PR description should have details on what the PR does. If it fixes an existing issue it
should end with “Fixes #XXX”.
- If your PR is co-authored or based on an earlier PR from another contributor,
please attribute them with
Co-authored-by: name <name@example.com>. See
GitHub’s multiple author
guidance
for further details. - When all tests are passing and all other conditions described herein are satisfied, a maintainer
will be assigned to review and merge the PR.
- Once you submit a PR, please do not rebase it. It’s much easier to review if subsequent commits
are new commits and/or merges. We squash and merge so the number of commits you have in the PR
doesn’t matter.
- We expect that once a PR is opened, it will be actively worked on until it is merged or closed.
We reserve the right to close PRs that are not making progress. This is generally defined as no
changes for 7 days. Obviously PRs that are closed due to lack of activity can be reopened later.
Closing stale PRs helps us to keep on top of all the work currently in flight.
Maintainer PR Review Policy
- See CODEOWNERS.md for the current list of maintainers.
- A maintainer representing a different affiliation from the PR owner is required to review and
approve the PR.
- When the project matures, it is expected that a “domain expert” for the code the PR touches should
review the PR. This person does not require commit access, just domain knowledge.
- The above rules may be waived for PRs which only update docs or comments, or trivial changes to
tests and tools (where trivial is decided by the maintainer in question).
- If there is a question on who should review a PR please discuss in Slack.
- Anyone is welcome to review any PR that they want, whether they are a maintainer or not.
- Please make sure that the PR title, commit message, and description are updated if the PR changes
significantly during review.
- Please clean up the title and body before merging. By default, GitHub fills the squash merge
title with the original title, and the commit body with every individual commit from the PR.
The maintainer doing the merge should make sure the title follows the guidelines above and should
overwrite the body with the original commit message from the PR (cleaning it up if necessary)
while preserving the PR author’s final DCO sign-off.
Decision making
This is a new and complex project, and we need to make a lot of decisions very quickly.
To this end, we’ve settled on this process for making (possibly contentious) decisions:
- For decisions that need a record, we create an issue.
- In that issue, we discuss opinions, then a maintainer can call for a vote in a comment.
- Maintainers can cast binding votes on that comment by reacting or replying in another comment.
- Non-maintainer community members are welcome to cast non-binding votes by either of these methods.
- Voting will be resolved by simple majority.
- In the event of deadlocks, the question will be put to steering instead.
DCO: Sign your work
The sign-off is a simple line at the end of the explanation for the
patch, which certifies that you wrote it or otherwise have the right to
pass it on as an open-source patch. The rules are pretty simple: if you
can certify the below (from
developercertificate.org):
Developer Certificate of Origin
Version 1.1

Copyright (C) 2004, 2006 The Linux Foundation and its contributors.
660 York Street, Suite 102,
San Francisco, CA 94110 USA

Everyone is permitted to copy and distribute verbatim copies of this
license document, but changing it is not allowed.


Developer's Certificate of Origin 1.1

By making a contribution to this project, I certify that:

(a) The contribution was created in whole or in part by me and I
    have the right to submit it under the open source license
    indicated in the file; or

(b) The contribution is based upon previous work that, to the best
    of my knowledge, is covered under an appropriate open source
    license and I have the right under that license to submit that
    work with modifications, whether created in whole or in part
    by me, under the same open source license (unless I am
    permitted to submit under a different license), as indicated
    in the file; or

(c) The contribution was provided directly to me by some other
    person who certified (a), (b) or (c) and I have not modified
    it.

(d) I understand and agree that this project and the contribution
    are public and that a record of the contribution (including all
    personal information I submit with it, including my sign-off) is
    maintained indefinitely and may be redistributed consistent with
    this project or the open source license(s) involved.
then you just add a line to every git commit message:
Signed-off-by: Joe Smith <joe@gmail.com>
using your real name (sorry, no pseudonyms or anonymous contributions.)
You can add the sign-off when creating the git commit via git commit -s.
If you want this to be automatic you can set up some aliases:
git config --add alias.amend "commit -s --amend"
git config --add alias.c "commit -s"
Fixing DCO
If your PR fails the DCO check, it’s necessary to fix the entire commit history in the PR. Best
practice is to squash
the commit history to a single commit, append the DCO sign-off as described above, and force
push. For example, if you have 2 commits in
your history:
git rebase -i HEAD^^
(interactive squash + DCO append)
git push origin -f
Note, that in general rewriting history in this way is a hindrance to the review process and this
should only be done to correct a DCO mistake.
4.4 - Code of Conduct
This section includes Code of Conduct of Envoy Gateway.
Envoy Gateway follows the CNCF Code of Conduct.
4.5 - Maintainers
This section includes Maintainers of Envoy Gateway.
The following maintainers, listed in alphabetical order, own everything
- @AliceProxy
- @arkodg
- @Xunzhuo
- @zirain
- @qicz
Emeritus Maintainers
- @danehans
- @alexgervais
- @skriss
- @youngnick
4.6 - Release Process
This section tells the release process of Envoy Gateway.
This document guides maintainers through the process of creating an Envoy Gateway release.
Release Candidate
The following steps should be used for creating a release candidate.
Prerequisites
- Permissions to push to the Envoy Gateway repository.
Set environment variables for use in subsequent steps:
export MAJOR_VERSION=0
export MINOR_VERSION=3
export RELEASE_CANDIDATE_NUMBER=1
export GITHUB_REMOTE=origin
Clone the repo, checkout the main branch, ensure it’s up-to-date, and your local branch is clean.
Create a topic branch for adding the release notes and updating the VERSION file with the release version. Refer to previous release notes and VERSION for additional details.
Sign, commit, and push your changes to your fork.
Submit a Pull Request to merge the changes into the main branch. Do not proceed until your PR has merged and
the Build and Test has successfully completed.
Create a new release branch from main. The release branch should be named
release/v${MAJOR_VERSION}.${MINOR_VERSION}, e.g. release/v0.3.
git checkout -b release/v${MAJOR_VERSION}.${MINOR_VERSION}
Push the branch to the Envoy Gateway repo.
git push ${GITHUB_REMOTE} release/v${MAJOR_VERSION}.${MINOR_VERSION}
Create a topic branch for updating the Envoy proxy image to the tag supported by the release. Reference PR #958
for additional details on updating the image tag.
Sign, commit, and push your changes to your fork.
Submit a Pull Request to merge the changes into the release/v${MAJOR_VERSION}.${MINOR_VERSION} branch. Do not
proceed until your PR has merged into the release branch and the Build and Test has completed for your PR.
Ensure your release branch is up-to-date and tag the head of your release branch with the release candidate number.
git tag -a v${MAJOR_VERSION}.${MINOR_VERSION}.0-rc.${RELEASE_CANDIDATE_NUMBER} -m 'Envoy Gateway v${MAJOR_VERSION}.${MINOR_VERSION}.0-rc.${RELEASE_CANDIDATE_NUMBER} Release Candidate'
Push the tag to the Envoy Gateway repository.
git push ${GITHUB_REMOTE} v${MAJOR_VERSION}.${MINOR_VERSION}.0-rc.${RELEASE_CANDIDATE_NUMBER}
This will trigger the release GitHub action that generates the release, release artifacts, etc.
Confirm that the release workflow completed successfully.
Confirm that the Envoy Gateway image with the correct release tag was published to Docker Hub.
Confirm that the release was created.
Note that the Quickstart Guide references are not updated for release candidates. However, test
the quickstart steps using the release candidate by manually updating the links.
Generate the GitHub changelog.
Ensure you check the “This is a pre-release” checkbox when editing the GitHub release.
If you find any bugs in this process, please create an issue.
Setup cherry picker action
After release branch cut, RM (Release Manager) should add job cherrypick action for target release.
Configuration looks like following:
  cherry_pick_release_v0_4:
    runs-on: ubuntu-latest
    name: Cherry pick into release-v0.4
    if: ${{ contains(github.event.pull_request.labels.*.name, 'cherrypick/release-v0.4') && github.event.pull_request.merged == true }}
    steps:
      - name: Checkout
        uses: actions/checkout@b4ffde65f46336ab88eb53be808477a3936bae11  # v4.1.1
        with:
          fetch-depth: 0
      - name: Cherry pick into release/v0.4
        uses: carloscastrojumo/github-cherry-pick-action@a145da1b8142e752d3cbc11aaaa46a535690f0c5  # v1.0.9
        with:
          branch: release/v0.4
          title: "[release/v0.4] {old_title}"
          body: "Cherry picking #{old_pull_request_id} onto release/v0.4"
          labels: |
            cherrypick/release-v0.4
          # put release manager here
          reviewers: |
            AliceProxy
Replace v0.4 with real branch name, and AliceProxy with the real name of RM.
Minor Release
The following steps should be used for creating a minor release.
Prerequisites
- Permissions to push to the Envoy Gateway repository.
- A release branch that has been cut from the corresponding release candidate. Refer to the
Release Candidate section for additional details on cutting a release candidate.
Set environment variables for use in subsequent steps:
export MAJOR_VERSION=0
export MINOR_VERSION=3
export GITHUB_REMOTE=origin
Clone the repo, checkout the main branch, ensure it’s up-to-date, and your local branch is clean.
Create a topic branch for adding the release notes, release announcement, and versioned release docs.
- Create the release notes. Reference previous release notes for additional details. Note: The release
notes should be an accumulation of the release candidate release notes and any changes since the release
candidate.
- Create a release announcement. Refer to PR #635 as an example release announcement.
- Include the release in the compatibility matrix. Refer to PR #1002 as an example.
- Generate the versioned release docs:
make docs-release TAG=v${MAJOR_VERSION}.${MINOR_VERSION}
Sign, commit, and push your changes to your fork.
Submit a Pull Request to merge the changes into the main branch. Do not proceed until all your PRs have merged
and the Build and Test has completed for your final PR.
Checkout the release branch.
git checkout -b release/v${MAJOR_VERSION}.${MINOR_VERSION} $GITHUB_REMOTE/release/v${MAJOR_VERSION}.${MINOR_VERSION}
If the tip of the release branch does not match the tip of main, perform the following:
Create a topic branch from the release branch.
Cherry-pick the commits from main that differ from the release branch.
Run tests locally, e.g. make lint.
Sign, commit, and push your topic branch to your Envoy Gateway fork.
Submit a PR to merge the topic from of your fork into the Envoy Gateway release branch.
Do not proceed until the PR has merged and CI passes for the merged PR.
If you are still on your topic branch, change to the release branch:
git checkout release/v${MAJOR_VERSION}.${MINOR_VERSION}
Ensure your local release branch is up-to-date:
git pull $GITHUB_REMOTE release/v${MAJOR_VERSION}.${MINOR_VERSION}
Tag the head of your release branch with the release tag. For example:
git tag -a v${MAJOR_VERSION}.${MINOR_VERSION}.0 -m 'Envoy Gateway v${MAJOR_VERSION}.${MINOR_VERSION}.0 Release'
Note: The tag version differs from the release branch by including the .0 patch version.
Push the tag to the Envoy Gateway repository.
git push origin v${MAJOR_VERSION}.${MINOR_VERSION}.0
This will trigger the release GitHub action that generates the release, release artifacts, etc.
Confirm that the release workflow completed successfully.
Confirm that the Envoy Gateway image with the correct release tag was published to Docker Hub.
Confirm that the release was created.
Confirm that the steps in the Quickstart Guide work as expected.
Generate the GitHub changelog and include the following text at the beginning of the release page:
# Release Announcement

Check out the [v${MAJOR_VERSION}.${MINOR_VERSION} release announcement]
(https://gateway.envoyproxy.io/releases/v${MAJOR_VERSION}.${MINOR_VERSION}.html) to learn more about the release.
If you find any bugs in this process, please create an issue.
Announce the Release
It’s important that the world knows about the release. Use the following steps to announce the release.
Set the release information in the Envoy Gateway Slack channel. For example:
Envoy Gateway v${MAJOR_VERSION}.${MINOR_VERSION} has been released: https://github.com/envoyproxy/gateway/releases/tag/v${MAJOR_VERSION}.${MINOR_VERSION}.0
Send a message to the Envoy Gateway Slack channel. For example:
On behalf of the entire Envoy Gateway community, I am pleased to announce the release of Envoy Gateway
v${MAJOR_VERSION}.${MINOR_VERSION}. A big thank you to all the contributors that made this release possible.
Refer to the official v${MAJOR_VERSION}.${MINOR_VERSION} announcement for release details and the project docs
to start using Envoy Gateway.
...
Link to the GitHub release and release announcement page that highlights the release.
4.7 - Working on Envoy Gateway Docs
This section tells the development of Envoy Gateway Documents.
The documentation for the Envoy Gateway lives in the docs/ directory. Any
individual document can be written using either reStructuredText or Markdown,
you can choose the format that you’re most comfortable with when working on the
documentation.
Documentation Structure
We supported the versioned Docs now, the directory name under docs represents
the version of docs. The root of the latest site is in docs/latest/index.rst.
This is probably where to start if you’re trying to understand how things fit together.
Note that the new contents should be added to docs/latest and will be cut off at
the next release. The contents under docs/v0.2.0 are auto-generated,
and usually do not need to make changes to them, unless if you find the current release pages have
some incorrect contents. If so, you should send a PR to update contents both of docs/latest
and docs/v0.2.0.
It’s important to note that a given document must have a reference in some
.. toctree:: section for the document to be reachable. Not everything needs
to be in docs/index.rst’s toctree though.
You can access the website which represents the current release in default,
and you can access the website which contains the latest version changes in
Here or at the footer of the pages.
Documentation Workflow
To work with the docs, just edit reStructuredText or Markdown files in docs,
then run
This will create docs/html with the built HTML pages. You can view the docs
either simply by pointing a web browser at the file:// path to your
docs/html, or by firing up a static webserver from that directory, e.g.
If you want to generate a new release version of the docs, like v0.3.0, then run
make docs-release TAG=v0.3.0
This will update the VERSION file at the project root, which records current release version,
and it will be used in the pages version context and binary version output. Also, this will generate
new dir docs/v0.3.0, which contains docs at v0.3.0 and updates artifact links to v0.3.0
in all files under docs/v0.3.0/user, like quickstart.md, http-routing.md and etc.
Publishing Docs
Whenever docs are pushed to main, CI will publish the built docs to GitHub
Pages. For more details, see .github/workflows/docs.yaml.